Almost two years ago, I wrote a post about setting up an unidirectional SSH tunnel. That sure is good, but… we can do better, can’t we? 😉 Let’s try to make it bidirectional now, so we can really do what we want through it, both ways. Because it gets boring to do step by step overdetailed guides I’ll just cover the key steps. That should be more than enough for someone familiar with editing configuration files as well as setting up basic SSH tunnels via PuTTY.
First, the “what you need” checklist:
- 2 computers, among which one easily reachable i.e. not behind some corporate firewall or some misconfigured router (you know, port-forwarding and such)
- on one computer (the server, the one easily reachable), OpenSSH ; on the other, PuTTY. Note that I won’t cover the funky details about how to set up OpenSSH on Windows. I’ll just be using the quick’n easy way: the OpenSSH that comes already installed with Ubuntu Server, managed from Webmin…
Now 3 fairly simple steps:
Configuring OpenSSH
Not much work to do there. The only thing you need is to allow backward port forwarding, which is for obvious security reasons disabled by default. So simply add something like:
# For symmetrical tunnel

GatewayPorts clientspecified
to sshd_config (full path for me was /etc/ssh/sshd_config). For more details you might want to check out the manual about OpenSSH SSH daemon (SSHd) configuration there.
Just don’t forget to apply the changes (push “Apply changes” if in Webmin, or just restart the daemon.
Configure PuTTY
That’s always the most boring part. I never manage to find the configuration items I’m looking for easily…
In the Session section, indicate you host name (for instance IP or domain name pointing to your server), the port where the SSH server listens, and pick a name for your session.
In the Connection/Proxy section, you may need to configure your enterprise proxy in the case where you have to use, for instance, a corporate HTTP proxy. It’s not the case anymore for me so I’ll skip this part which I can’t test anyway at the moment. There is however one thing you should configure on this configuration tab: set “Do DNS name lookup at proxy end” to Yes. NOT to “auto” (default), otherwise the tunnel will leak information about the sites you visit… through DNS lookups, obviously. Also, I don’t know how other browsers behave, but on Firefox you also need to go to about:config and set network.proxy.socks_remote_dns to true.
In the Connection/SSH section, there are some potentially interesting settings: you may want to check “don’t start a shell or command at all” in order to avoid accidentally typing commands if you don’t need to, and you may also want to enable compression if your corporate network is slow or congested (compressing data might also be a good excuse for using an SSH tunnel ;)).
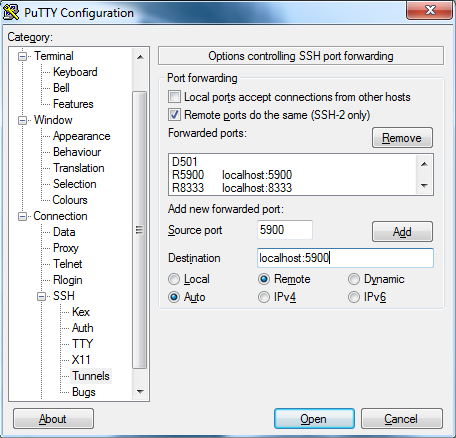
Finally, and this is where the symmetrical magic happens, it’s time to go to the Connection/SSH/Tunnels section. Here we’ll check “remote ports do the same (SSH-2 only)” (“local ports accept connections from other hosts” is not required), then you have to add items to the list of forwarded ports. It’s actually quite simple, for instance for a standard outbound tunnel you configure the source port, pick the “dynamic” radio button and press “Add” (this will be equivalent to launching PuTTY with an option such as “-D [source port]”. Now for the symmetrical part, or to be more accurate, for the reverse tunneling part, you fill the source port too, but also you enter the destination, typically it will be localhost:[port number], and then you check the “remote” radio button and hit “Add”. To make sure you get it right (actually, to make sure I get it right when I read that again in a year or two ^^), here’s a picture of what you should get:
And that should pretty much cover it. Don’t forget to save this session! (go back to the Session screen, pick a name if you hadn’t already done so and hit save)
Launching PuTTY with the session
Simply make a shortcut or batch file containing something like:
C:\Path\to\putty.exe -load “[the name of your session]”
Then enter your login credential for the OpenSSH server and voilà, your SYMMETRICAL SSH tunnel is operational.
References
Actually, apart from the man page about SSHd, all those references have been quite useless apart from the fact that they motivated me to keep digging. Most of those are rather poor guides IMO, at least in the way they deal with reverse tunneling. I still list them here because I don’t have the heart to close all these tabs forever without saving the URLs first (and no, I don’t want to favorite them).
- sshd_config(5): OpenSSH SSH daemon config file – Linux man page
- BYU Computer Science Department – SSH Tunnels
- Reverse SSH Tunneling on HowtoForge
- SSH Tunnelling (Port Forwarding) — RZG
- Chapter 3: Using PuTTY
- IBM – SSH Tunneling With PuTTY (look at that URL… if it’s not gone in a few years, that will be some miracle for sure…)
- Using PuTTY to tunnel to multiple machines on your remote network on Info4Admins.com
- Red Hat Magazine – SSH Port Forwarding

Just wanted to give you props. You helped me to secure and industrial automation network. Thank-you.