Skip to content


We won’t have a decentralized Internet, and it’s your fault

Well possibly it’s not your own fault (you’re here, after all), but it’s most people’s fault. Here’s is why

1) People are lazy

Maintaining a contact book with names and e-mails? That’s so 2010! With half the internet population on Facebook, or on a few other social networks each more populated than a couple of continents, almost all your contacts are in your “apps”, with name and picture. So convenient. And those who aren’t there? Well you just don’t bother talking to them much, peer-pressuring them into becoming part of the Big Data horde.

2) People crave censorship

Seriously, they do. Of course, they don’t like to be censored themselves. But they love censoring contents they don’t like. They can’t imagine not censoring contents they don’t like.
A few months ago, I went to a presentation (well, it was more of a workshop actually) about ZeroNet. One of the first question from the (small and select) audience was “Can I block contents?”. Not as in “can I hide it from my view?”, but as in “can I prevent my node – if not the network – from spreading it?”. By the way, ZeroNet makes this possible (and actually really trivial and accessible) so if you’re committed to content-neutrality you’ll want to prefer things like Tor and Freenet.

And the “problem” with a decentralized Internet is that you can’t censor it. So people just won’t support it: as soon as they see something they don’t like and that they can’t get removed, they run back to Big Tech, which can trivially be bullied into removing anything deemed too insufficiently politically correct (if they don’t just do it by themselves before anyone asks them to)

3) People cheer for monopolies

Well, not monopolies, but quasi-monopolies or ultra-dominant actors. Which is pretty much the same, apart from the fact that it provides the “it’s not a monopoly” defense, in addition to “it’s okay as long as it’s cheap” (where the dollar-equivalent value of privacy is zero). They want to use a service that all their friends already use, making it a nightmare for new actors to pop up, and an even worse nightmare for companies to remain mid-sized: either you take all the market, or you get just a few customers who are only here because they care about diversity (and who likely won’t be numerous enough to make the business sustainable).

NB: Just stumbled on this old draft and figured I’ll never really finish it, so here it is, as is

Posted in privacy.


How to install MJ12node (the Majestic-12 distributed crawler) on Ubuntu 17.10 / 18.04

A long time ago, I posted a guide to install MJ12node on Debian 7.

Since then, the process became a lot simpler because Linux got better, Mono got better and Majestic got better too. But still, I always have minor difficulties when trying to set up a new node, and apparently I’ve always forgotten to take notes and save them here… so far. Because it’s pretty trivial, I’ll just list the commands with very minimalist comments. They may need some adjustments for versions, but should remain quite stable, at least for a while:

Dependencies:

sudo apt-get install mono-runtime libmono-corlib4.5-cil libmono-sqlite4.0-cil

(that may seem small, but it will actually install a bunch of packages, for a total of about 40 MiB)

Get the latest node, unpack it and make it executable (for some reason, out-of-the-box it isn’t):

wget https://www.majestic12.co.uk/files/mj12node/mono/mj12node_linux_v1716_net45.tgz
tar xf mj12node_linux_v1716_net45.tgz
cd MJ12node
sudo chmod run.py 744

That’s it, you’re ready to start your node, use this command if you don’t want the web interface to be launched (it has no password and is on by default, hurray for security…)

./run.py -t

Note that in the console, you can at any time start and stop the web interface by pressing S for Start and T for sTop (but the point of running with -t is that it will remain off when the node auto-restarts, which is a setting I use and I recommend you to use, to avoid crashes)

Credits to myself lol, I actually found a forum post I made earlier while redacting this post, although I assume from the look of it that it was a summary of helping tips provided by other forum users 😉

On a side note, I also found another thread with instructions to run a more up-to-date Mono version. I guess you could do it if you really want to use cutting-edge Mono, but unlike a few years ago, the Mono version provided in recent Ubuntu distributions is stable enough. With MJ12node 1.7.16 and whatever Mono is the default in Ubuntu 17.10, and my node configured to restart every 12h, I’ve never had any crash that would cause my node to stop crawling forever, like I used to have before.

Posted in servers, software.


A Freenet disk space mystery

I’ve been running, on and off, a bunch of Freenet nodes for a while, and I’ve never had issues with them. But a couple of months ago, a server where I installed it pretty much as usual started behaving strangely. Its available disk space got consumed regularly, at a fairly large rate of 4-5 GiB/day, as I could see from the ever decreasing available space shown by Webmin and df -h.

I tried looking for what could be causing it, learning a few interesting commands in the process, for instance this one:
find / -mmin -2 -ls
to see all written files in the last 2 minutes, and this one:
du -h / | grep -P '^[0-9\.]+[GT]'
to list all folders with a size measured in TiB or GiB.
The latter returned just the /usr folder, with a bit more than 1 GiB, and Freenet’s folder (actually a subfolders chain to the Freenet datastore), with the expected (considering my setup), non-growing size of 1.6 TiB. This, while my 2TB disk was almost 100% full, because I didn’t have time to investigate it sooner. All-in-all, I had about 250 GiB unaccounted for.
I also tried a tool called ncdu, which didn’t give interesting results either.

Oh and by the way, if you’re wondering what happens when your disk is full, it’s not really an enjoyable experience: Apache HTTPd goes down (Webmin too as far as I remember), the computer is globally slow (for instance, running du -h / | grep -P '^[0-9\.]+[GT]' took ages, while it took seconds when I ran it earlier while there was some space left), and some basic feature like auto-completion in the console via TAB don’t work (you suddenly realize that for some reason they require a bit of disk space, even for what could be assumed to be read-only, namely fetching the file/folder names in the current folder)

Anyhow, I was pretty puzzled and, since asking for help didn’t work, I decided I would just free some space, do an up-to-date backup of the single service I was running there, and reinstall, updating Ubuntu in the process. How to free some space? Well, Freenet appeared to be the obvious choice, as deleting just one file from the datastore would give me more than a month of time, assuming the disk would keep filling up at 5 GiB a day.
But I wanted to do it clean, so first I tried shutting down Freenet the clean way, using ./run.sh stop. To my surprise, it worked without a scratch. I assumed that shutting down would require writing a few things that were in RAM, so I expected at least a slow down, but no: no error, not even an abnormally large delay.
Then I had to choose what to delete. I listed all files and I picked CHK-cache.hd, because 1) it was big and 2) I thought maybe I’d want to restart the node later and having a flushed cache sounded better than having a flushed store or other things. ls -la said CHK-cache.hd was 730 GiB.

I ran rm CHK-cache.hd. Something else about having a full drive: it makes deleting a file slow as hell. I could follow, via df -h, first the MiBs and then the GiBs slowly getting freed, which became faster and faster the more space was already freed up. And then, maybe half an hour later, the file was finally fully deleted. The whole 730 GiB file. And I now had 971 GiB of free space. Which, obviously, was 241 GiB too much. So this is the mystery, where did those 241 GiB vanish? How come ls -la returned a size of 730 GiB for a file which was actually taking 971 GiB? Not sure I’ll ever know. Was I lucky I picked this very file, or would another big Freenet datastore file have freed mystery extra space too? (actually, only CHK-store.hd was as big, the other big files were all smaller than 40 GiB)

This was the first time I experienced that, after running Freenet on maybe a dozen of other setups with never a single disk space issue… I hope it won’t happen against, but at least now if it happens I’ll know where to look, what to stop, and what to delete.

Posted in Linux, software.


Generating a large (>8kb) key with GnuPG 2.x

A long while ago, I posted a guide on how to compile GnuPG 1.x, for Windows, to generate a large key.
This time, here is a guide on how to compile GnuPG 2.x (2.2.7 at the time of writing) to generate a large key. However, because GnuPG 2 is so hard to compile for Windows, I’ll compile it “only” for Linux. I’ll compile for Linux, but you’ll find at the end a link to another guide that covers cross-compiling on Linux for Windows. If you’re not on Linux, you can just do this in a virtual machine, it’s practical enough nowadays.

Starting remarks

Before going further, you may have noticed that the title mentions >8KB, not >4KB, even though 4092 bits is the first limit you’ll hit when trying to create a big key. This is because there is a simple solution that doesn’t require compiling if you “only” want a 8192 bits key: simply use the --enable-large-rsa flag, i.e.:

gpg --full-generate-key --enable-large-rsa

This guide might miss dependencies, as I used a Linux install that wasn’t completely new (Kubuntu 18.04, upgraded from 17.04 via 2x do-release-upgrade), although I hadn’t used it much either. Notably, I already had Kleopatra and GnuPG installed (from the distribution-provided packages). If at some points you have dependencies missing, maybe check out the list in the mini-guide there and also simply go for apt-get install gcc. Hopefully, the error messages you may encounter about missing dependencies should be helpful enough in guiding you to the right packages.

Onto the guide per se now.

Compiling

First, grab the source code for the required packages on this page:
https://www.gnupg.org/download/index.html
I needed: GnuPG, Libgpg-error, Libgcrypt, Libksba, Libassuan, nPth (surprisingly, I didn’t need Pinentry)

Compile and install everything but GnuPG. For instance, for Libgcrypt:

tar xf libgcrypt-1.8.2.bz2
cd libgcrypt-1.8.2
./configure
make && make install

(NB: you might want to also run make test)

Now extract GnuPG’s source code but don’t compile just yet. Open gnupg-2.2.7/g10/keygen.c, and there are 2 lines you need to edit in order to remove the hard-coded 4096 bits cap:
Line 1642, change:

  const unsigned maxsize = (opt.flags.large_rsa ? 8192 : 4096);

for instance into:

  const unsigned maxsize = (opt.flags.large_rsa ? 8192 : 409600);

(NB: 409600 is way too large, but it doesn’t hurt either)

Line 2119, change:

      *max = 4096;

for instance into:

      *max = 409600;

Those line numbers are given for version 2.2.7, which is the current version as I’m writing those lines. They might move around a bit in future version, see the end of this post for larger snippets.

Then you can compile and install GnuPG. The commands are similar as for the libraries we dealt with earlier, except from one tweak:

cd gnupg-2.2.7
./configure --enable-large-secmem
make
make test
make install

The --enable-large-secmem flag is what will allow GnuPG to allocate a large enough amount of memory, hence to deal with large keys without crashing.

Generating the key

Run gpg --version to make sure you’re running the compiled version, since your distribution’s version will most likely always be a bit behind (for instance, I just compiled version 2.2.7 and the version from my distribution, which I can still obtain via gpg2 --version, is 2.2.4).

Then you can move on to the key generation, as usual:

gpg --full-generate-key

(if you edited like I did, do not use the –enable-large-rsa flag, as it will still have a size limit of 8912 bits)

If you use the gpg-agent from your distribution’s installation, you’ll get a warning saying gpg-agent is older than gpg: it’s not a problem (but it could be avoided using something like killall gpg-agent && gpg-agent --daemon --pinentry-program /usr/bin/pinentry.

The key generation will take _a lot_ of time. You can speed it up by using the computer (downloading a large file, moving the mouse, typing stuff…), which will help generate entropy.

Once your key is generated, you may want to edit its preferences to make sure compression is enabled. Maybe the GnuPG I compiled didn’t have compression support, but the result was my key had “uncompressed” as the only accepted compression.

gpg --edit-key [keyID]
setpref AES256 AES192 AES 3DES SHA512 SHA384 SHA256 SHA224 SHA1 BZIP2 ZLIB ZIP Uncompressed MDC

Appendixes

Fixing “agent_genkey failed: No pinentry”

If you get an error message saying:

gpg: agent_genkey failed: No pinentry
Key generation failed: No pinentry

it means that for some reason gpg-agent failed to load pinentry. Make sure pinentry is installed (apt-get install pinentry-qt should do the trick, or downloading and compiling and installing it from GnuPG’s site, like we did for the other dependencies), then:

killall gpg-agent
gpg-agent --daemon --pinentry-program /usr/bin/pinentry

You might want to use locate pinentry first, to make sure /usr/bin/pinentry is the right path. (thanks to this ticket for pointers to this fix)

Larger code snippets

Here are longer snippets for more context:

Line 1642 is in function static int gen_rsa (int algo, unsigned int nbits, KBNODE pub_root, u32 timestamp, u32 expireval, int is_subkey, int keygen_flags, const char *passphrase, char **cache_nonce_addr, char **passwd_nonce_addr), in the following block:

  int err;
  char *keyparms;
  char nbitsstr[35];
  const unsigned maxsize = (opt.flags.large_rsa ? 8192 : 4096);

  log_assert (is_RSA(algo));

Line 2119 is in function static unsigned int get_keysize_range (int algo, unsigned int *min, unsigned int *max), in the following block:

    default:
      *min = opt.compliance == CO_DE_VS ? 2048: 1024;
      *max = 4096;
      def = 2048;
      break;

Why no ECC / Elliptic Curves?

ECC allows for much smaller keys and faster computation than RSA for an equivalent security level. For instance, AES 128 bits has roughly the same security as ECC 256 bits and RSA 3300 bits. But both RSA and ECC are weak to quantum computers and, from what I understood, a quantum computer will need to have an amount of qubits proportional to the size of the key to be able to crack it. Tada! What used to be a weakness of RSA, the key length, turns out to be (kind of) a strength.

This is why I’m still generating an RSA key and not an ECC one. Hopefully, next time I renew my key, I’ll have a post-quantum option.
Sorry for not digging a bit more into details here, I’m redacting this from memory, as struggling with GnuPG’s compilation and writing the rest of this post drained me more than I expected.

Update (2018-08-12): I randomly bumped into a paper titled Quantum Resource Estimates for Computing Elliptic Curve Discrete Logarithms, and it gives some interesting figures, notably solving a 256 bits Elliptic Curve Discrete Logarithm Problem (ECDLP) it would take 2330 qubits, vs 4719 qubits for a 521 bits ECDLP, 6146 qubits for a 3072 bits RSA and 30722 qubits for a 15360 bits RSA. So yup, definitely worth sticking to 8kb+ RSA in my opinion.

Why don’t we also change SECMEM_BUFFER_SIZE?

A link I mentioned earlier suggests increasing SECMEM_BUFFER_SIZE. I suspect this would allow creating even larger keys without running into memory allocation failures. However, this would also allow you to create keys so big that only your modified GnuPG can handle them. I don’t think that’s an acceptable option, but if you really, really want a huge key and don’t care if it’s hard to use practically, I suppose you can go ahead and increase SECMEM_BUFFER_SIZE.

Update (2019-01-24)

I just found this nice guide explaining how to cross-compile GnuPG on Linux for Windows. I tried it and it worked nicely. I still didn’t need to compile pinentry, nor ntbTLS. Zlib is optional too, but if you don’t compile it, your build will only have support for uncompressed data. I didn’t find how to support bzip2 (didn’t really look hard though, as my only interest was in making a build for exporting my key, not for daily use).
An important note if you want to play around with big keys: in order to successfully export my 16kb private key, I had to use both the customized gpg.exe and gpg-agent.exe
Posted in privacy, programming.


Saving Corsair mouse settings into the mouse

When my nice Logitech MX510 mouse died, I couldn’t find an equivalent replacement at Logitech and eventually went for a Corsair Sabre RGB.

It’s not quite the same, but overall it contains as many usable buttons (the one right under the wheel is just unusable to me) and looks like the wheel won’t catch dirt as easily. It also has lots of lights, which is quite a change coming from a mouse with no LEDs at all (although I’d rather not have those and have a lighter invoice…). The settings (speed, light, button mapping) are quite complete, however they only kick in when the control software (“Corsair Utility Engine”) starts, which I find a bit annoying. But this was also the case, to some extent with my previous mice.

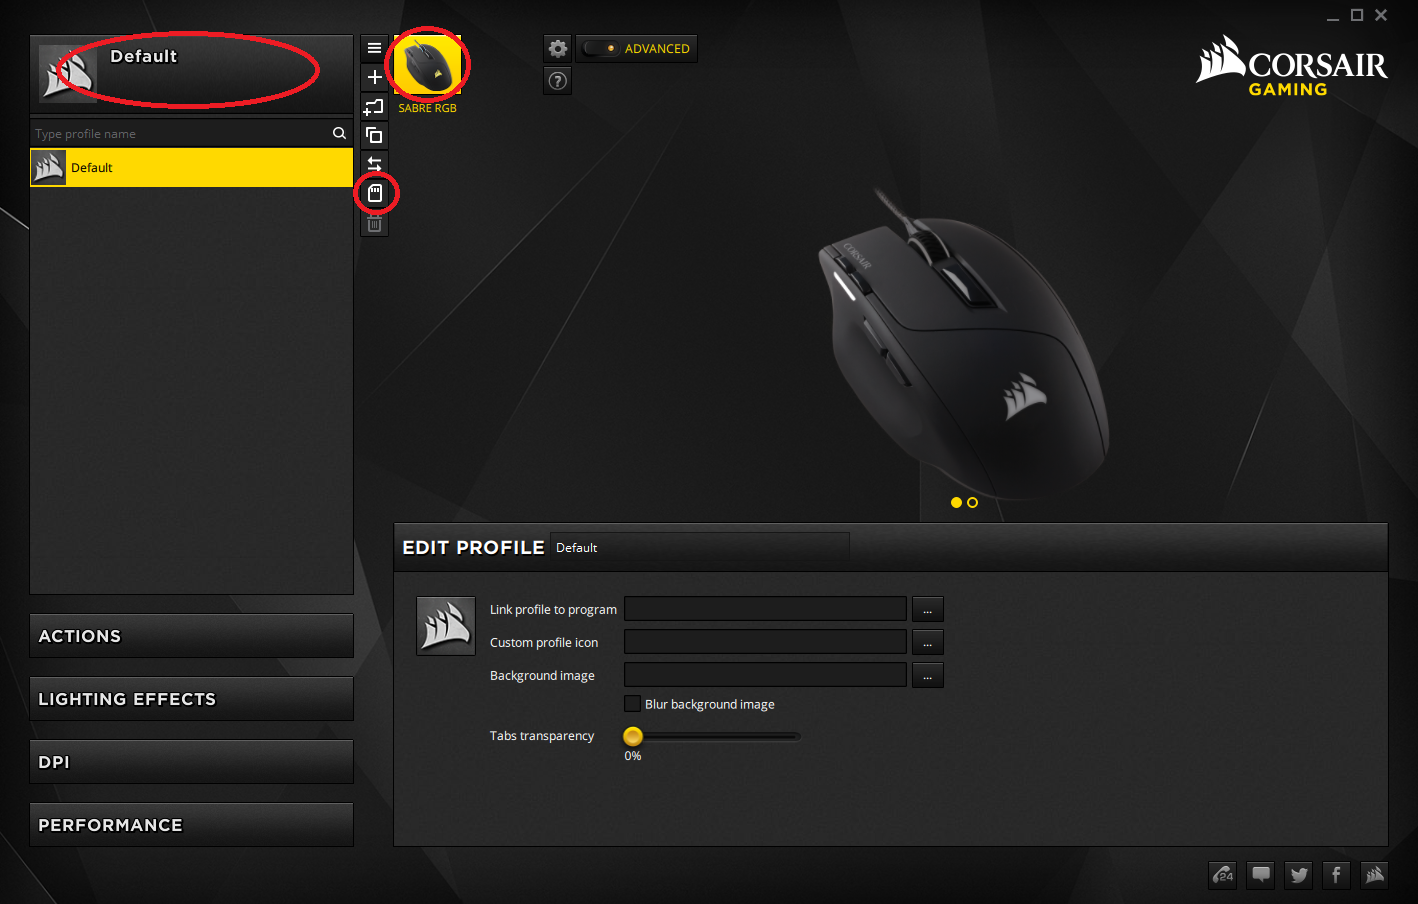
Gladly, there is a feature to store said settings in the mouse. The only trick is: it can be bloody hard to find. It’s a little button with an icon that looks kind of like a memory card, which is located on the right of the left menu and only appear when some conditions are met. So here’s a little “map” in order to easily find it:

Corsair Utility Engine - saving hardware profile

Those are the 3 key points: make sure the mouse is selected (right-most highlighted button yellow), and that the profiles list is selected too (toggled by clicking the left-most highlighted button). Then the 3rd, tiny button should appear and allow you to save your profile into the mouse.

I saved those URLs because those posts helped me, but to be honest I don’t really remember what were their interesting points… Still, credits where due ^^
https://www.reddit.com/r/Corsair/comments/702x1j/corsair_k95_problem_creating_hardware_profiles/
http://forum.corsair.com/v3/showthread.php?t=175568

Posted in hardware, Windows.


Linux Bash scripting: multi-line command and iterating over an array

It’s simple, really, but I rarely use bash so I’m always a little lost when I try to do something not absolutely trivial in it…
I’ll just put my script here and explain below:

images=("pic 1.jpg" \
"pic 2.jpg" \
"pic 3.jpg")

for i in "${images[@]}"
do
   echo $i
   node ../path/to/myscript.js --source "$i"
done

What it does is:
– define an array: myArray = ( elem1 elem2 )
– use multiple lines. To do so: when you split your command over multiple lines, end each non-end line with “\” to indicate continuation on the next line
– then iterate over it, echoing each element and running a command (with quotes because the elements of my array contain spaces)

This (very recent) source was helpful: Bash For Loop Array: Iterate Through Array Values

Posted in Linux.


How to compare 2 folders using Windows PowerShell

Just copying here the Windows PowerShell script from this blog post because I really don’t want to ever lose it:

$folderA = Get-ChildItem -Recurse -path C:\folderA\
$folderB = Get-ChildItem -Recurse -path C:\folderB\
Compare-Object -ReferenceObject $folderA -DifferenceObject $folderB

I use 2 different computers to deploy a Serverless project I work on, and I noticed the deployment artifacts had different sizes depending on the computer I deployed from :s So I grabbed an archive from each deployment, unzipped them, and used this to compare them.

It turned out the culprit was Ava, which puts a bunch of js and js.map files in node_modules/.cache/ava. Excluding the whole node_modules/.cache/** from Serverless deployment (serverless.yml > package > exclude) allowed me to shrink the deployment artifact by a few hundreds of kB. On a side note, it appears that Ava leaves behind a lot of trash in this folder, so you may want to purge it manually from time to time.

Posted in JavaScript / TypeScript / Node.js, Windows.


How to disable OneSyncSvc (and other services)

I recently set up a new computer at work, and it uses Windows 10. That famous Windows that gives you even less control over your computer than the previous ones, going decreasingly with every new “Creator Update” or whatever fancy name they call those Service Packs.
As usual, I went to Services to locate and disable those that seem useless. Among those, one stood out: “OneSyncSvc_381d9”. As I tried to disable it via the “Services” control panel, it wouldn’t let me, saying “The parameter is incorrect” whenever I would try to set its startup type to “Disabled” or just “Manual”.

So I looked for another way to disable it, and the registry (if you still don’t know it, just run “regedit”) did the trick. Go to HKEY_LOCAL_MACHINE\SYSTEM\CurrentControlSet\Services\OneSyncSvc_381d9, and then modify the Start DWORD value. 0 means “boot”, 1 means “system” (not sure what those 2 do, I don’t see any service using those values), 2 means start automatically, 3 means start manually, 4 is what interests us here and means disabled.

All other services can be configured there, although OneSyncSvc is actually the only service I didn’t manage to tame via the Services panel, simply by going to HKEY_LOCAL_MACHINE\SYSTEM\CurrentControlSet\Services\[service name].

Bonus: little list of useless services that you can most likely smash:
– Connected User Experiences and Telemetry
– Downloaded Maps Manager
– dmwappushsvc

Posted in Windows 10.


How to hide processes from other users in Linux’s “top”

A few months ago, I had to set up a server where a bunch of people would need to connect to directly access a MariaDB SQL database, with also an SSH access for tunneling. A few users would also use that server for other purposes, and I didn’t want everyone to view everyone else’s processes, which to my surprise was possible by default (if any user runs top, they can see everyone’s running processes :s).

Starting with Linux kernel version 3.2, a setting was (finally) added to prevent unprivileged users from seeing each others’ processes. Basically, you need to set the hidepid option to 2 for the /proc filesystem:

nano /etc/fstab
– Find the line starting with “proc”
– Add hidepid=2 to the options

For instance, the line:

proc            /proc   proc    defaults      0       0

Becomes

proc            /proc   proc    defaults,hidepid=2      0       0

Then don’t forget to save and restart

Note that sometimes the proc line can be missing (I have this case on a VPS), I’m not sure what should be done then… Maybe adding the proc line as quoted above would work (?)

Update (2018-09-10)

I just had the case of the missing proc line in a recent install of Kubuntu 18.04 on a new PC (which used UUID= as a way to name devices in there), and adding the proc line, as mentioned in this old Red Hat ticket, did work. Here’s my full /etc/fstab file, for illustration purpose:

# /etc/fstab: static file system information.
#
# Use 'blkid' to print the universally unique identifier for a
# device; this may be used with UUID= as a more robust way to name devices
# that works even if disks are added and removed. See fstab(5).
#
#                
# / was on /dev/sda2 during installation
UUID=7d74ab46-7af7-4f19-8063-89cb86870a83 /               ext4    errors=remoun$
# /boot/efi was on /dev/sda1 during installation
UUID=DB49-AA98  /boot/efi       vfat    umask=0077      0       1
/swapfile                                 none            swap    sw           $
proc            /proc   proc    defaults,hidepid=2      0       0

Posted in Linux, servers.


How to disable the Ctrl+Shift keyboard layout switch shortcut in Windows 10

Whoever created this shortcut must probably never play games. That default key combination for switching keyboard layout is so easy to hit by accident, when many, many games will use Shift as the run key and Ctrl as the crouch key.

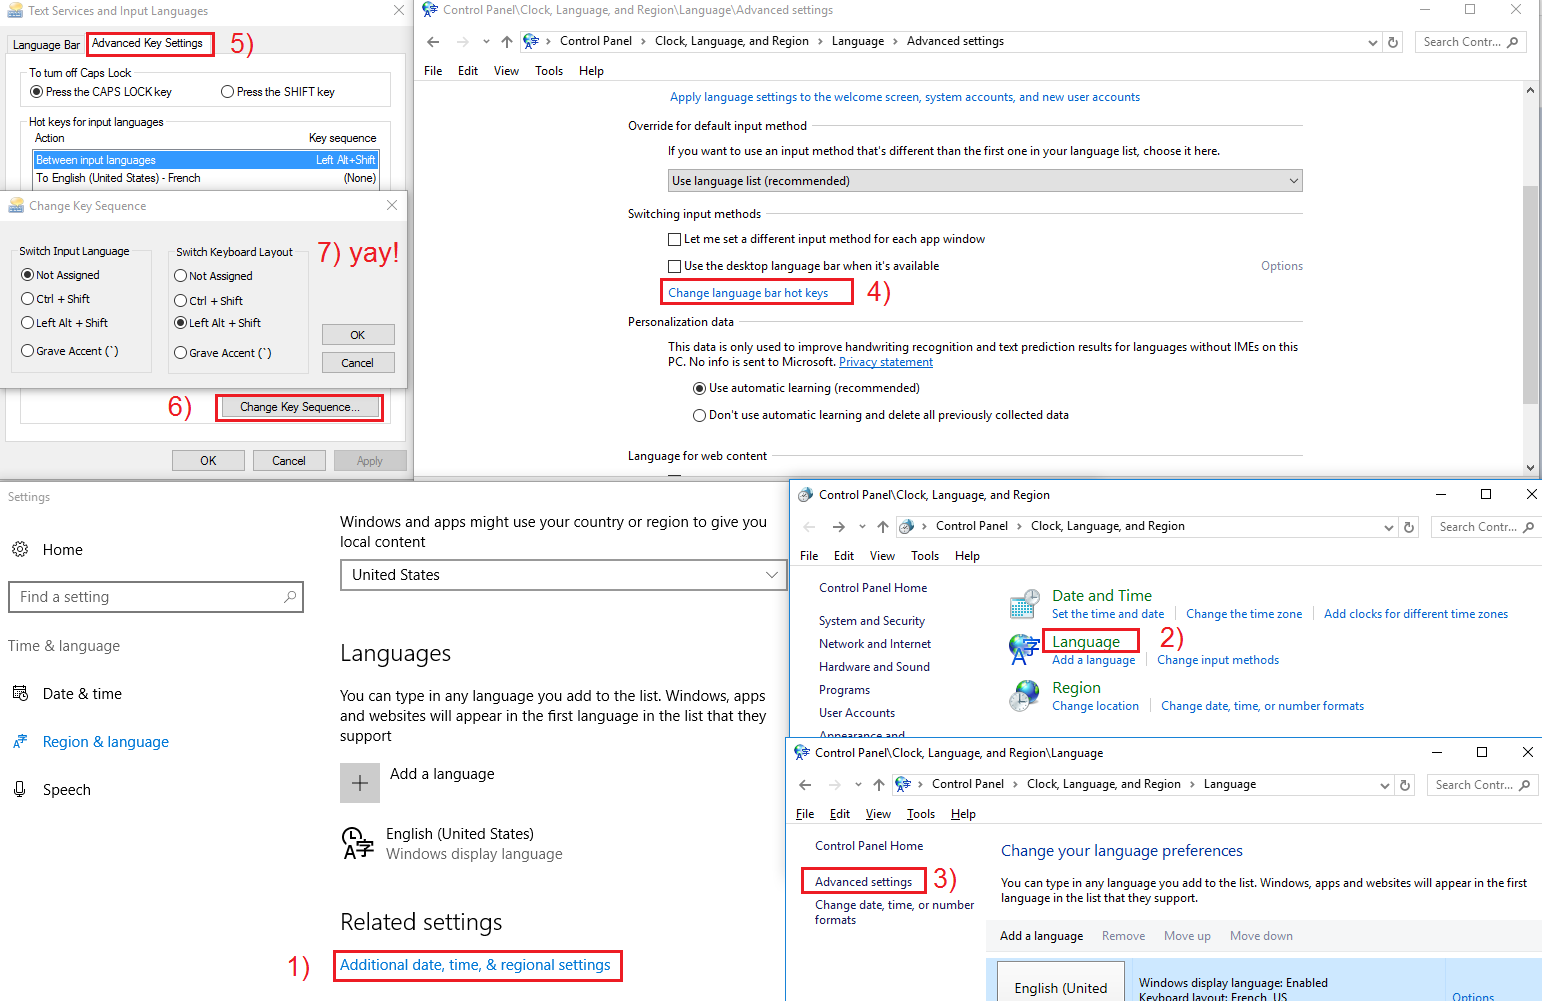
Anyhow, it can be disabled (or changed, with limited options available though), even though it’s pretty tedious to find. Here’s the screenshot with most of the steps (I just skipped the first one):
Configuring the keyboard switching shortcut in Windows 10

  1. Open Region & Language settings (can be obtained directly by typing that into the Start Menu)
  2. Click “Additional date, time, & regional settings”
  3. Click “Language”
  4. Click “Advanced Settings”
  5. Click “Change language bar hot keys”
  6. Switch to the “Advanced Key Settings” tab
  7. Select “Between input languages” (that should be already selected, though, I think) and click “Change Key Sequence…”
  8. Yay! You’ve arrived! Enjoy 🙂 Note that you can set a shortcut both for switching input language and keyboard layout. I disabled the first and changed the second to something I hope I’ll accidentally hit less often. It’s a pity we can’t fully customize this and must instead choose from only 3 options (or disable)

Posted in Windows 10.