Skip to content


Fixing some Serverless issues on Windows

Today I finally got to run serverless dash deploy myself (not that I was that eager to deploy) (and yes, I know this is a pretty outdated version as dash deploy doesn’t even exist anymore, we’ll have to update it some time – hopefully sooner than later). And as everyone else in the company uses Mac OS, I had to face my own issues on Windows.

Error #1: “Cant find AWS credentials”

Even though I did run aws configure to fill in my aws_access_key_id and my aws_secret_access_key, serverless (0.5.5, by the way) was’t able to use them. I did check the %UserProfile%/.aws/credential file, they were their indeed. I even added aws_live_profile = default, as was suggested somewhere, it didn’t help.
It turned out that in Serverless version <1, those aws_access_key_id and aws_secret_access_key need to be added as environment variables (if you don’t know how to do that, or even if you do, I suggest you have a look at Rapid Environment Editor, which is freeware). That did the trick indeed.
Oh, and here is the Github ticket that says this was fixed in Serverless 1.

Error #2: “Error: EMFILE: too many open files”

After fixing the credential bullshit, I got that one. That was quite frustrating because all the “solutions” I found were directed towards MacOS or Linux, and were based on running some kind of ulimit -n 10480 command, which doesn’t exist one Windows and seemed to be able to cause some trouble anyway.
After trying turning it off and on again, I thought: let’s try another obvious thing: update Node.js. I was running a fairly recently updated Node.js 6.7.0, new version was 6.8.1, and… it worked!
So yeah, basically: just update Node.js and hopefully you should be good. Even with a pretty outdated Windows (running Win 7 with many, many missing updates here)

Posted in programming, Windows.


aToad #20: Cheat Engine, CoSMOS, OllyDbg

2 generic game cheating tools and a disassembler

Cheat Engine is a free and open source memory scanner and editor, written mainly in Object Pascal (yeah, tough). It can be used quite easily to search for some in-game value (like ammunition count) and lock or edit it, for games that don’t encrypt or scramble what they put in memory. The provided tutorial is quite helpful to figure out how to do it. For games that try to protect themselves, this will be quite harder and I actually didn’t quite follow the provided tutorial about those. But if you study enough, it should be feasible as I’ve seen many trainers created with Cheat Engine.
Another great thing about it is that the community can share “cheat tables”, which are premade script or memory address lists that you can just load to cheat right away without diving yourself into memory analysis of your favorite games 🙂

CoSMOS is a close source equivalent published by CheatHappens. There might be a conflict of interests there, as CheatHappens provide non-free trainers to their subscribers. Still, CoSMOS is free to use and anyone can share their cheat scripts. However, in practice, the amount of freely available scripts seems low (quite a few are published in subscriber-only portions of the CheatHappens forums).
The greatest thing about CoSMOS in my opinion is the decent amount of pretty nice video tutorials to learn basic to expert use of the program. It should be moderately easy to follow these tutorials to learn to use Cheat Engine, as both programs are so similar.

OllyDbg is a free debugger, which I found mentioned in one of those CoSMOS video tutorial. It seems that some portions are open source, but sadly it also seems not to be very maintained as the latest update dates back to 2014… I guess time will tell. Meanwhile, it’s a nice debugger and it also comes with a disassembler.

Posted in A Tool A Day, programming.


How to configure Fiddler to gateway to a SOCKS proxy

In a previous post (in French), I presented how to use Fiddler as a man-in-the-middle between your browser and a website in order to remove some anti-anti-pub JavaScript code.

I also mentioned that I had an issue with it: I usually connect to internet via a SOCKS proxy, but for some reason, despite carefully setting up a gateway in Fiddler’s options (as below, in Tools > Telerik Fiddler Options > Gateway), that proxy was ignored. The error message said “WARNING: SOCKS Gateway was specified but is ignored“.
Fiddler broken gateway settings
And indeed, all the requests routed through Fiddler did appear from my IP rather than my chosen proxy. Weak, I was a sad panda 🙁

But all was not lost, as the proxy can also be configured via your Fiddler script! Sounds tedious at first, but actually it’s just a one-liner: at the beginning of your OnBeforeRequest function, add this line (of course edit the IP and port):
oSession["x-OverrideGateway"] = "socks=127.0.0.1:XXX";
Fiddler script line to use a SOCKS proxy

“Et voilĂ ” 🙂

Posted in programming, web development.


How to browse and edit saved form data in Firefox

Firefox doesn’t provide an easy way to browse, not to mention edit, its saved form data. However, they are simply stored in a plain SQLite database, so they are quite easy to access using an appropriate third party tool.

The form data are stored (on Windows) in %appdata%\Mozilla\Firefox\Profiles\[your FX profile]\formhistory.sqlite
On Linux and Mac OS, I’m not sure where this folder is located but the same principles apply: find that formhistory.sqlite file

Then you can open this file using any SQLite database browser, for instance DB Browser for SQLite, which is free and open source, and available on Windows, Linux and Mac OS. Using it should be quite straightforward if you have ever just touched some database software. The data of interest are in the table moz_formhistory, which is structured as follow:
– id
– fieldname (= name of the form field, so if a form contains a field named “Email”, then Firefox will suggest all the values you already used for such a field)
– value
– timesUsed (I believe this is used to prioritize the suggested values)
– firstUsed (timestamp of the first time the value was used)
– lastUsed (ditto for last time)
– quid (this one I have not idea)

Note that you can open the database for viewing while Firefox is running, but if you want to edit if you should first close Firefox, then open the database and do your stuff, then save, then re-open Firefox. Otherwise, you’ll probably lose your modifications.

Posted in Firefox.


A brief tutorial to encode in x265 (and Opus) using FFmpeg

So far, I’ve mainly used handbrake to encode into x265 (that’s more or less the same thing as HEVC, more specifically HEVC or H.265 is the current kickass video standard, and x265 is one of the main – and best – HEVC encoders), because I don’t encode much and their GUI is comfortable. However, they lack Opus support and tend to be slow to upgrade the included x265 library, even in their nightly builds. So I looked for another solution, and eventually settled for FFmpeg.

FFmpeg is a well-known media encoding software, with support for more than 100 codecs, which are very regularly updated to their current version. Its only but big weakness is that it doesn’t have a GUI and I find the documentation a bit lacking. That steep learning curve is what prevented me from using it until now, but I eventually went ahead and took the time to figure out all I needed to. And here it goes.

Without further ado, here is the command I now use (detailed explanations follow):
for %%A in (*.mkv) do ffmpeg -i "%%A" -vf scale=400:300 -ac 2 -metadata:s:s:0 language=eng -disposition:s:0 default -codec:a libopus -b:a 48k -vbr on -compression_level 10 -frame_duration 60 -application audio -codec:v libx265 -preset veryfast -x265-params crf=23 -codec:s copy "out/%%A"

The for ... do part and the %%A thing are for Windows bash: I look for all files in the current folder named (something).mkv, I process them and I put the output file into an “out” subfolder, keeping the filename intact. Here is what the command looks like without the bash loop, with this time an AVI video as input:
ffmpeg -i "inputvideo.avi" -vf scale=400:300 -ac 2 -metadata:s:s:0 language=eng -disposition:s:0 default -codec:a libopus -b:a 48k -vbr on -compression_level 10 -frame_duration 60 -application audio -codec:v libx265 -preset veryfast -x265-params crf=23 -codec:s copy "outputvideo.mkv"

-i "inputvideo.avi" is our input file… not much to say about this.

-vf scale=400:300 means rescale the video to 400 px width x 300 px height. You can also set only the height or the width, and set the other one to “-1” so that FFmpeg will set it to the proper value to keep the original ratio. I picked those values for the example, you’ll probably want to set yours quite higher, except for testing where a tiny resolution with an ultrafast preset helps save time. To read more about scaling, see Scaling (resizing) with ffmpeg on the FFmpeg wiki.

-ac 2 means convert the audio to stereo. I use this to get a smaller audio compression, obviously you don’t have to if you want to keep 5.1 or something. To read more about changing the number of audio channels, see Manipulating audio channels with ffmpeg on the FFmpeg wiki

-metadata:s:s:0 language=eng means add a metadata that says the first subtitles track (numbered 0) is in English. The first s: is to access all streams, the second s: is to access all subtitles streams (and then obviously 0 is the index of the first and only stream in my case). See also Set a subtitle language using ffmpeg on Stackoverflow.

-disposition:s:0 default means set the first subtitles track as default. Not that unlike the previous option, only one s: is needed, as the first one mentioning streams wouldn’t make sense (disposition is always for streams). See also ffmpeg set subtitles track as default on Stackoverflow.

-codec:a libopus -b:a 48k -vbr on -compression_level 10 -frame_duration 60 -application audio is the block of parameters for the audio codec. We use libopus (Opus), with a bitrate (-b:a 48k) of 48 kbps (for Opus in stereo, that should be good enough as long as you’re not recording something highly musical), with variable bitrate (VBR) enabled (-vbr on), with the highest compression level (-compression_level 10, slower but better compression, this is actually the default), with a frame duration of 60 ms (-frame_duration 60, this is the highest possible duration value, having a longer frame duration improves quality a bit at low bitrates), with a intended use of generic audio (-application audio). See also libopus in the ffmpeg-codecs documentation and How to encode audio with Opus codec on Stackoverflow.

-codec:v libx265 -preset veryfast -x265-params crf=23 is the block of parameters for the video codec. We use libx265 (x265), with a veryfast preset (possible values range from placebo to ultrafast, with the default being medium, and are analyzed here), and using constant quality / rate factor (CRF) with a quality of 23. Unless you really need to target a specific size, I strongly advise you to use CRF instead of average bitrate: this will allow you to do only one pass at no quality cost, and will give you the best size for the quality you want. See also libx265 in the ffmpeg-codecs documentation and How to generate an MP4 with H.265 codec using FFmpeg on Stackoverflow.

-codec:s copy means we copy the subtitle stream. See also How do I add and/or keep subtitles when converting video on AskUbuntu.

Finally, “outputvideo.mkv” is our output file. Note that here we create an MKV file, but to create an MP4 file instead all you have to do is pick the .mp4 extension instead of .mkv.

A little note about multiple streams: I’ve never dealt with multiple streams of the same kind so far, so I don’t know what do to in such cases. My best guess is that there must be a way to pick streams via their index… I’ll update this post if one day I have to deal with such multistream file.

Posted in multimedia, software.

Tagged with .


Script Greasemonkey pour bloquer un utilisateur sur GNT

(NB: exceptionally, this article is written in French because it’s targeted at a French, non-English speaking audience – sorry for the inconvenience)

GNT (GĂ©nĂ©ration Nouvelles Technologies) est un site de news IT. Les news y sont gĂ©nĂ©ralement intĂ©ressantes, mais les commentaires sont souvent peuplĂ©es de trolls. Il est possible de bloquer des utilisateurs, mais il faut ĂȘtre inscrit et abonnĂ©. Voici un script qui vous permettra de bloquer des utilisateurs directement via Greasemonkey (pas la peine donc de se connecter et/ou s’abonner). Notez que je mentionne Greasemonkey car c’est l’extension la plus connue, mais si vous ĂȘtes sous Chrome/Chromium/Vivaldi/etc, le script marche aussi avec Tampermonkey.
Pour utiliser le script, installez-le puis modifiez la liste des utilisateurs bannis (pour l’exemple j’ai bloquĂ© “Bruno” et “Bruno2”): il suffit de changer ou ajouter des noms dans la liste “configBannedUsers”.

Télécharger le script (installation directe dans Greasemonkey / Tampermonkey)
Source:

/***********
Copyright (c) 2016 PatheticCockroach - https://www.patheticcockroach.com

Permission is hereby granted, free of charge, to any person obtaining a copy
of this software and associated documentation files (the "Software"), to deal
in the Software without restriction, including without limitation the rights
to use, copy, modify, merge, publish, distribute, sublicense, and/or sell
copies of the Software, and to permit persons to whom the Software is furnished
to do so, subject to the following conditions:

The above copyright notice and this permission notice shall be included in all
copies or substantial portions of the Software.

THE SOFTWARE IS PROVIDED "AS IS", WITHOUT WARRANTY OF ANY KIND, EXPRESS OR
IMPLIED, INCLUDING BUT NOT LIMITED TO THE WARRANTIES OF MERCHANTABILITY,
FITNESS FOR A PARTICULAR PURPOSE AND NONINFRINGEMENT. IN NO EVENT SHALL THE
AUTHORS OR COPYRIGHT HOLDERS BE LIABLE FOR ANY CLAIM, DAMAGES OR OTHER
LIABILITY, WHETHER IN AN ACTION OF CONTRACT, TORT OR OTHERWISE, ARISING FROM,
OUT OF OR IN CONNECTION WITH THE SOFTWARE OR THE USE OR OTHER DEALINGS IN THE
SOFTWARE.
***********/

// ==UserScript==
// @name			GNT Ban Hammer
// @namespace		GNT_Ban_Hammer
// @description		Ignore specified users on GNT
// @version			1
// @encoding		UTF-8
// @include			http*://*.generation-nt.com/*
// @grant			none
// @author			PatheticCockroach - https://www.patheticcockroach.com
// @license			MIT License
// @url				https://notepad.patheticcockroach.com/4262/script-greasemonkey-pour-bloquer-un-utilisateur-sur-gnt/
// ==/UserScript==

// Configure here your list of banned users
let configBannedUsers = ["Bruno","Bruno2"];

const GNT_Ban_Hammer_REPEAT_INTERVAL = 100;
const GNT_Ban_Hammer_REPETITIONS = 30;
const GNT_Ban_Hammer_RESTART_INDEX = 0;
let GNT_Ban_HammerCount = 0;

let hideParentOfComUserDiv = function(comUserDiv, userName = "") {
	console.log("GNT Ban Hammer: blocking user \"" + userName + "\"");
	comUserDiv.parentNode.innerHTML = "User "+userName+" blocked by GNT Ban Hammer";
};
let nodeInnerHTMLContains = function(node,text) {
	return (node.innerHTML.indexOf(text) > -1) || (node.innerHTML == text);
};

let GNT_Ban_Hammer_start = function(){
	console.log('GNT_Ban_Hammer_start running');
	
	// commentaire
	let comUserDivs = document.getElementsByClassName('comm_user');
	for(let comUserDiv of comUserDivs) {
		for(let bannedUser of configBannedUsers) {
			if(nodeInnerHTMLContains(comUserDiv, bannedUser)) {
				hideParentOfComUserDiv(comUserDiv, bannedUser);
			}
		}
	}
	
	// tribune summary
	let tribuneUserSpans = document.getElementsByClassName('tribune-nick');
	for(let tribuneUserSpan of tribuneUserSpans) {
		for(let bannedUser of configBannedUsers) {
			if(nodeInnerHTMLContains(tribuneUserSpan, bannedUser)) {
				hideParentOfComUserDiv(tribuneUserSpan.parentNode, bannedUser);
			}
		}
	}
	
	// tribune full
	let tribuneUserDivs = document.getElementsByClassName('pm_user');
	for(let tribuneUserDiv of tribuneUserDivs) {
		for(let bannedUser of configBannedUsers) {
			if(nodeInnerHTMLContains(tribuneUserDiv, bannedUser)) {
				hideParentOfComUserDiv(tribuneUserDiv, bannedUser);
			}
		}
	}
	
	if (GNT_Ban_HammerCount++ < GNT_Ban_Hammer_REPETITIONS) {
		setTimeout(GNT_Ban_Hammer_start, GNT_Ban_Hammer_REPEAT_INTERVAL);
	} else {
		GNT_Ban_Hammer_armPagination();
	}
};

let GNT_Ban_Hammer_restart = function() {
	console.log('GNT_Ban_Hammer_restart running');
	GNT_Ban_HammerCount = GNT_Ban_Hammer_RESTART_INDEX;
	setTimeout(GNT_Ban_Hammer_start, GNT_Ban_Hammer_REPEAT_INTERVAL);
};

let GNT_Ban_Hammer_armPagination = function() {
	let paginationDiv = document.querySelector('.pagination');
	paginationDiv.onclick = GNT_Ban_Hammer_restart;
	/*
	paginationDiv.innerHTML='';
	let paginationDivInner = document.querySelector('.pagination');
	let paginationLinks = paginationDiv.getElementsByTagName('a');
	for(let paginationLink of paginationLinks) {
		paginationLink.onclick = GNT_Ban_Hammer_restart;
	}
	*/
};

GNT_Ban_Hammer_start();

// the part below is just here as a quick check that there is no runtime error
var input=document.createElement("input");
input.type="button";
input.value="GreaseMonkey Button";
input.onclick = showAlert;
document.body.appendChild(input);
function showAlert() {
    alert("Hello World");
}

Posted in Greasemonkey scripts.


How to set up a Tor relay node in a VM

A simple way to support Tor is to simply run a relay (or, for those who lack bandwidth, run a bridge). However, I’m not a big fan of running it just like this on my PC, so I prefer to isolate it in a virtual machine. That sounds safer, and it allows me to just keep the VM image whenever I change computer. And also, it will allow you to use the very same Linux distribution as I use, for the most similar setup steps possible 😉

The first step is to install a virtualization software. But while you do, you may want to start downloading Debian, or whichever distro you want to run in your VM. I suggest getting the 64 bits Debian network install (the *netinst.iso), as we won’t need many packages. If you can use it, the torrent download is usually a lot faster than the direct download.
Back to the virtualization software: VirtualBox will do nicely. Install it, and when you do, should you choose to mess with the installation settings, make sure you keep “VirtualBox Bridge Networking” selected.

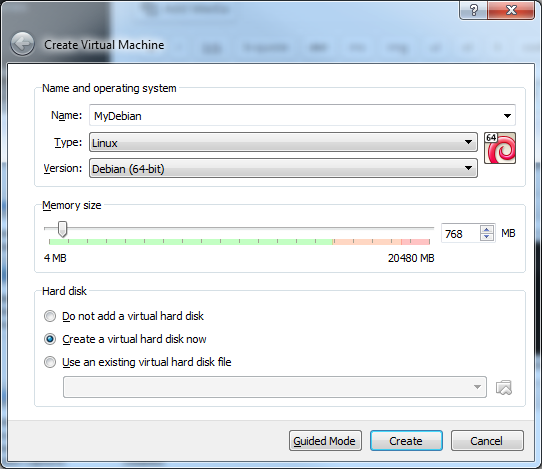
Then start create a new virtual machine: set the type to “Linux” and version to “Debian (64-bit)”.
You can leave the memory at 1024 MB. You could even try to set it lower (512 MB should actually be more than enough). This is because we will install only the bare minimum (and notably, no desktop environment). If you plan to install a desktop environment and other stuff (and basically, do more than just run the Tor relay on this), then you should consider adding a bit more RAM.
In the hard drive section, check “Create a virtual hard disk now”.
Creating a VirtualBox VM, step 1

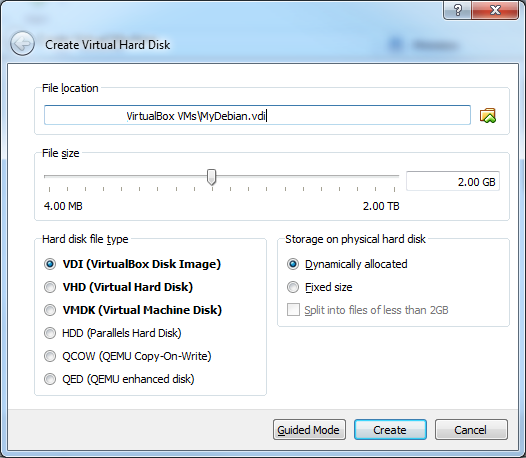
Choose a path to store your disk image. Set the size to around 2 GB (you could probably set it to a bit less, 1.5 GB should be enough if you stick to the minimal install, but it might cause space issues when upgrading), or a bit higher if you don’t mind wasting a bit to avoid potential limitations in the future.
For hard drive disk type, pick VDI (VirtualBox Disk Image), and choose dynamically allocated storage if you’re using an SSD (otherwise, on a HDD, choosing fixed size will avoid fragmentation). Hit “create” and voilĂ , you’re ready to install Debian.
Creating a VirtualBox VM, step 2

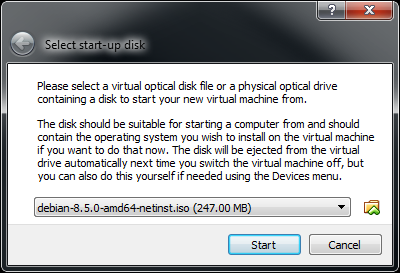
Start your brand new VM. A dialog will pop up, asking you to select a start-up disk: browse to the Debian ISO image you just downloaded and select it.
First-time launch of a VirtualBox VM - Select start-up disk

You’ll arrive to the “Debian GNU/Linux installer boot menu”. Select, as you prefer, either “Install” or “Graphical install”. I’ll pick graphical install for the sake of tutorial aesthetics, but non-graphic has the same options, only you don’t get a mouse pointer to make the navigation easier.
Pick your language, country, locale, keyboard layout, etc.
At some point, you’ll have to set up a root password and a user password: I would advise to keep them all lower-case letters at first, because I once had problem with numbers (so bad that I had to reinstall as I couldn’t log in…).
Then you’ll reach the partitioning screen. Select “Manual” (as guided would create a useless swap partition), and create a unique, primary, bootable partition. When you’re done it should look like this:
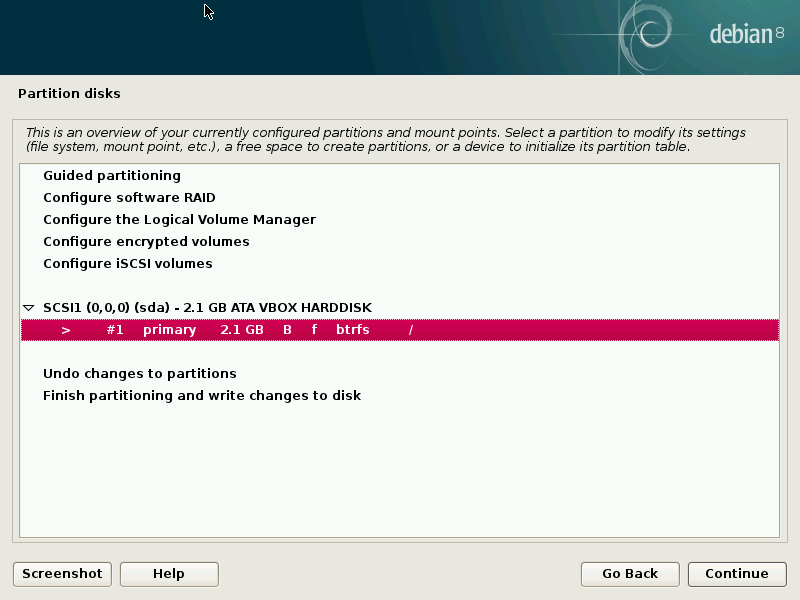
Debian installation - Creating a partition

It will complain that it has no swap, just ignore it and confirm you want to write the changes. Then wait a couple of minutes for the base system to install. Pick a Debian archive mirror, configure your HTTP proxy (hopefully you have none and should leave that field empty – if you do use an HTTP proxy, I think you’ll need to search for proper ways to configure Tor), wait a bit for APT to set up, configure the popularity contest if you want, and finally you get to software selection. Unless you have specific needs or don’t want to do everything in the console (in which case you should install a desktop environment), uncheck everything.
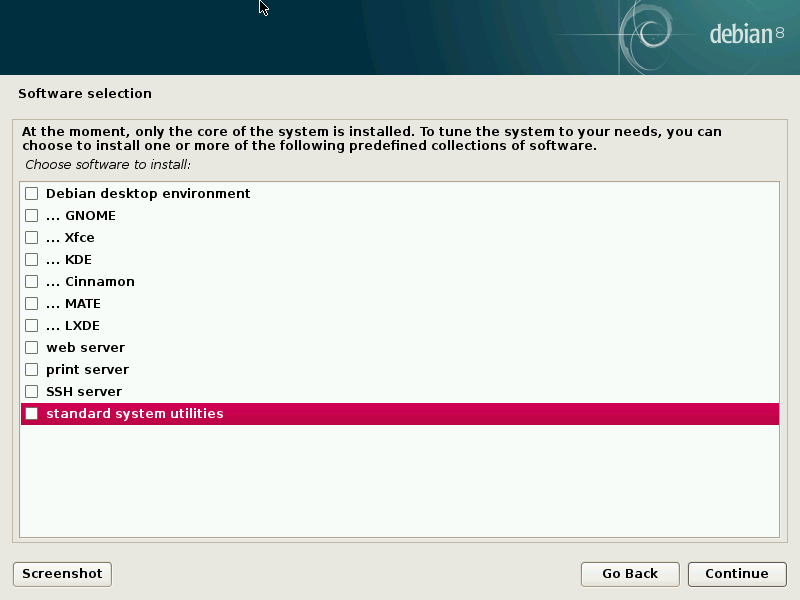
Debian installation - Minimalist software selection

Package installation should be fast as we selected the small possible set. Then install the GRUB boot loader to the master boot record (put it on /dev/sda), and voilĂ , installation complete. Click continue to reboot.

Rather than jumping straight into Tor installation, first shut down the machine. We need to configure some network stuff.
In VirtualBox main screen, go to the machine’s settings. Then to Network, and configure Adapter 1 so that it is attached to “Bridged Adapter”. I do this because I have a router, and most (if not all) ISPs where I live do provide a router. If you don’t have a router, then I think NAT would be more appropriate (and then I guess you’d need to configure port forwarding within VirtualBox itself). I found this page which explains the different network connection types quite well. It’s from the WMware documentation, but seems to translate directly to VirtualBox too.

Now you can launch the VM again. Log in, and after a few seconds you should be able to see your VM in your router’s interface. You can then use your router to assign a fixed local IP to the VM, and forward ports to it. You’ll need to forward at least 1 port for Tor relaying (same port as “ORPort” in Tor’s config), and a second one if you also enable the directory (same port as “DirPort” in Tor’s config).

For the Tor installation itself, I will refer you to my previous Tor installation guide here. It’s more than 4 years old already, but it still applies pretty much to the letter.
Note that the post focuses on creating a Tor relay, but it will only take a slightly different Tor configuration to create a bridge or an exit node.
If you have any questions, the comments are available as usual 😉

Posted in Tor.


How to set up link aggregation on ThecusOS

I have a Thecus N7510 NAS (but I suppose this should work on all Thecus NASes as long as they have 2 network ports), and it’s a good NAS (very good value for a 7-drives NAS) but its big weakness is the Ethernet ports, which are 100 Mbps and not Gigabit. It is however mitigated by the fact that you can aggregate the 2 ports and double the speed (in practice I reach up to ~38MB/s transfer speeds). But configuring the link aggregation isn’t very obvious, so here is a short guide showing how to.

NB: I used firmware version 2.05.14.5.cdv, which I think is ThecusOS 5 (?). The menu path will probably be a bit different in the upcoming ThecusOS 7, but I suppose the base principles will be similar.

– Plug ethernet cables on both ethernet ports, and on your router or switch
– Go to System Network → linking aggregation
– You’ll see a WAN/LAN1 tab and a LAN2 tab
– Notice the “IP”, “Netmask” and “Gateway” items in the WAN/LAN1 tab: you’ll need to copy those later
– Click on the “+” tab
– You should now have a window like this, with “Available Interfaces” on one side and “Selected Interfaces” on the other:
ThecusOS link aggregation - Picking network interfaces
– Move both interfaces from available to selected, and click “Link”
– You will now be back to the Link Aggregation screen, in a new tab called “LINK1”
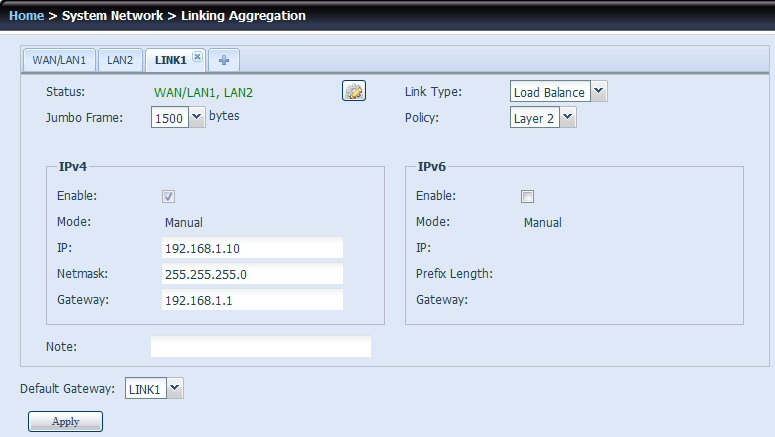
– Configure link type to “Load balance” (I’m not sure what extra stuff the other types do, see here or there of you want more details about them, but load balance is what I use and it _does_ double the speed). It should actually already be this way
– Copy “Netmask” and “Gateway” from the WAN/LAN1 tab. Assign an available IP (check what’s free on your router)
– Set default gateway to LINK1 (that should be already selected I think). Here’s a summary of what it should look like (with your own values for IP/netmask/gateway)
ThecusOS link aggregation - Setting getaway and netmask
– Click Apply. I think you will also need to reboot the NAS.
– Don’t forget now that the administration interface is on the new IP too!

And… voilĂ  🙂

Posted in servers.


Tweaking referer settings in Firefox (and Tor Browser)

I recently found a nice little summary of referrer-related settings in Firefox, which were modified heavily in Firefox 28. (NB: little history reminder, the settings names spell referer with just one r, as it was originally misspelled)

In about:config:

network.http.referer.XOriginPolicy
0 = always send,
1 = send if base domains match,
2 = send if hosts match

network.http.referer.spoofSource
false = send real referrer,
true = spoof referrer (use target URI as referrer)

network.http.referer.trimmingPolicy
0 = send full URI,
1 = scheme+host+port+path,
2 = scheme+host+port

Referrer processing is done in this order. So if XOriginPolicy is set to 2, then spoofSource and trimmingPolicy are useless if going from 1.mysite.com to 2.mysite.com, since no referrer is sent anyway.

The old setting, network.http.sendRefererHeader, is still there and can be used to completely disable referrer (by setting it to 0). Otherwise, to use the new settings described above, set it to 2 (default = always send referrer).

Note that even with the highest privacy & security settings, it seems that Tor Browser doesn’t touch those settings, so you’ll need to set them manually in Tor Browser too if you want to reduce referrer tracking.

Posted in Firefox, privacy.


Solving a compilation problem that may occur in Eclipse with TypeScript/Angular projects

The full error message is quite useless and is as follow:

Cannot compile modules unless the ‘–module’ flag is provided with a valid module type. Consider setting the ‘module’ compiler option in a ‘tsconfig.json’ file

The only thing I found about it is this bug discussion on GitHub, which doesn’t help much either, but gives a clue: basically, check that your tsconfig.json file is there (if not, run tsc -init) and looks good.

In a recent post, I showed how to hide files in a project. I use this to hide .js and .js.map files, and the node_modules folder. It seems that, in Eclipse 4.6 “Neon”, when you hide the node_modules right from the start (before the first TypeScript compilation in your project), it may cause that error message to pop up (actually it even caused an error message about @angular/core being not found), and then it will stick around.
Sadly, the only way I found to make it disappear is to delete the project and re-create it (NB: no need to delete the whole project, just remove the project from Eclipse, then delete the .project file, and then re-create a project in Eclipse). Then run a TypeScript compilation, and after that you should be able to hide the node_modules folder without the error message reappearing.

Posted in Eclipse, programming, web development.