Skip to content


Solving a compilation problem that may occur in Eclipse with TypeScript/Angular projects

The full error message is quite useless and is as follow:

Cannot compile modules unless the ‘–module’ flag is provided with a valid module type. Consider setting the ‘module’ compiler option in a ‘tsconfig.json’ file

The only thing I found about it is this bug discussion on GitHub, which doesn’t help much either, but gives a clue: basically, check that your tsconfig.json file is there (if not, run tsc -init) and looks good.

In a recent post, I showed how to hide files in a project. I use this to hide .js and .js.map files, and the node_modules folder. It seems that, in Eclipse 4.6 “Neon”, when you hide the node_modules right from the start (before the first TypeScript compilation in your project), it may cause that error message to pop up (actually it even caused an error message about @angular/core being not found), and then it will stick around.
Sadly, the only way I found to make it disappear is to delete the project and re-create it (NB: no need to delete the whole project, just remove the project from Eclipse, then delete the .project file, and then re-create a project in Eclipse). Then run a TypeScript compilation, and after that you should be able to hide the node_modules folder without the error message reappearing.

Posted in Eclipse, programming, web development.


Hiding some file types in Eclipse projects

I recently discovered TypeScript (yay, better late than never), which is really nice to turn JavaScript into something a lot more readable, particularly when you want to do a bit of OOP. I mean, I’m not an OOP addict, but still in some cases it is much more convenient than going full procedural.
Anyhow, for those of you who don’t know it, TypeScript is a superset of JavaScript, and when you use it, you have a “compiler” that converts your TypeScript into JavaScript + a map files. Which means that for 1 .ts file you actually write and read, you end up with 2 additional files (.js and .js.map) that you never really touch (at least not in the IDE). So, the file list gets clogged up, and I wondered if there is a way to hide files I don’t need to see in my usual IDE, Eclipse.

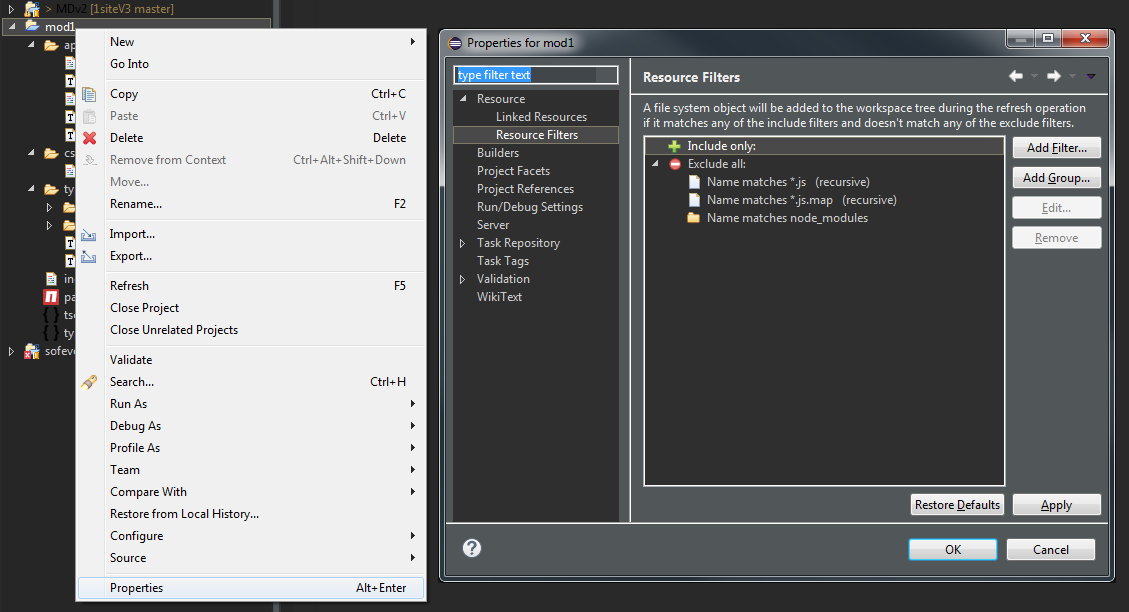
And there is an easy way indeed, here it is in just a picture:
Hiding specific file name patterns in Eclipse

And to sum it up:

  • right click on your project
  • in the menu, click properties
  • browse to Resource → Resource Filters
  • add the filters you want to exclude file patterns (you can use simple match, regular expressions, exclude by folder name, etc)
  • don’t forget to check “recursive” if you also want to match files within subfolders
  • press OK
  • You may need to refresh your project for the changes to show (left click on your project root and press F5)

I used that in Eclipse 4.6 “Neon”, but this should work across many versions.

Update (2016-07-08): my regex for .js files when using Angular 2

In Angular, there is a config file named systemjs.config.js, and I wanted to be able to view it in Eclipse. So I couldn’t just block all files matching the simple expression “*.js”. It turned out that matching a string that doesn’t contain a word using a regex isn’t trivial, but I found a solution there on stackoverflow. Transposed to matching all .js files but the ones containing “config”, here’s my regex: ((?!config).)*\.js

Posted in Eclipse, programming.


A little catch when submitting an iOS app with Facebook SDK

When you submit your app to Apple, at the end of the process they ask you if the app uses the iOS Advertising Identifier. As far as I understood, the Facebook SDK does use this identifier, so if you want to avoid wasting a week because of a rejected submission, you should declare that you use it. More specifically:

This app uses the Advertising Identifier to (select all that apply)?
– Serve advertisements within the app
– Attribute this app installation to a previously served advertisement
– Attribute an action taken within this app to a previously served advertisement

If you will be using the Audience Network framework, you must select the first option.
If you are using our core framework to track install attribution and app events, please select the second and third options.
If you are using both, select all three.

(source: https://developers.facebook.com/bugs/242477629268301/)

In the case of the app I’ve been working on, we track install attribution (to check of an ad on Facebook led to an app installation), so option 2 and 3.

Another interesting read (for historical purpose!):
http://stackoverflow.com/questions/21574680/app-rejected-because-of-advertisingidentifier-in-facebook-sdk-and-flurry-sdk

On a side note, Facebook’s tool to see if your app seems properly configured:
https://developers.facebook.com/tools/app-ads-helper/

Posted in programming, Xcode.


Going HTTPS (finally) with Let’s Encrypt

I’ve long used a CAcert certificate to provide secure access to this site, as I’m on a budget since the ads barely pay for 1% of the hosting. However, sadly CAcert certificates aren’t accepted by browsers without a warning first, so this remained a kind of hidden option. Now that Let’s Encrypt is getting mainstream enough, it was time to finally get a “proper” SSL/TLS certificate.

I will list here the commands I used for setting up my first Let’s Encrypt certificate, which I added to my picture gallery a couple of weeks ago. It’s actually extremely close to what’s listing in Let’s Encrypt’s “Getting Started” guide. Note that as I’m using a distribution which doesn’t have a letsencrypt package, I’m using the compile-it-yourself version, but as you’ll see it’s still very easy (only it takes up more space because you need to install Git).

First, install Git if you don’t already have it:
apt-get install git

Now go to a folder where you want to place Let’s Encrypt (anywhere you want, as long as it’s not exposed to the world – ie don’t put this into your web-facing folders), for instance:
cd /home/mycertifs

Then clone letsencrypt:
git clone https://github.com/letsencrypt/letsencrypt

View the help if you want to (NB: at this moment, it will check for update and install):
./letsencrypt-auto --help
You see we use ./letsencrypt-auto, it’s because we use the manually installed version. If you are lucky enough to have a distro package, the command will be instead just letsencrypt

Then to create the certificate:
./letsencrypt-auto certonly --webroot -w /home/www/gal -d gal.patheticcockroach.com
This will request a certificate for gal.patheticcockroach.com and check domain ownership by placing a verification file in /home/www/gal (make sure that’s where the webserver can be reached from the world). The script takes care of generating a server private key, etc.
The first time you run the script, it will also ask for an e-mail to be used in case of issue/recovery (be sure to enter a real one!).

When all is done, the script will output generic advice + some info on your newly created certificate. Here’s a verbatim:

IMPORTANT NOTES:
 - If you lose your account credentials, you can recover through
   e-mails sent to [the e-mail you entered].
 - Congratulations! Your certificate and chain have been saved at
   /etc/letsencrypt/live/gal.patheticcockroach.com/fullchain.pem. Your
   cert will expire on 2016-06-26. To obtain a new version of the
   certificate in the future, simply run Let's Encrypt again.
 - Your account credentials have been saved in your Let's Encrypt
   configuration directory at /etc/letsencrypt. You should make a
   secure backup of this folder now. This configuration directory will
   also contain certificates and private keys obtained by Let's
   Encrypt so making regular backups of this folder is ideal.
 - If you like Let's Encrypt, please consider supporting our work by:

   Donating to ISRG / Let's Encrypt:   https://letsencrypt.org/donate
   Donating to EFF:                    https://eff.org/donate-le

As a bonus, here is how I configured my Apache HTTPd 2.2 virtual host. There are probably better settings for SSLCipherSuite, but as of today they still get an A at the SSL Labs HTTPS tester and at HT Bridge’s too. So most likely that should be good enough for you (and if it’s not, I’m pretty sure that then you have the budget for an EV certificate 😉 ):

<VirtualHost *:443>
   ServerName gal.patheticcockroach.com
   DocumentRoot "/home/www/gal/"
   <Directory "/home/www/gal/">
   allow from all
   Options -Indexes
   </Directory>
   SSLEngine on
   SSLProtocol all -SSLv2 -SSLv3
   SSLHonorCipherOrder On
   SSLCipherSuite ECDHE-RSA-AES256-GCM-SHA384:ECDHE-RSA-AES256-SHA384:ECDHE-RSA-AES128-GCM-SHA256:ECDHE-RSA-AES128-SHA256:AES128-GCM-SHA256:HIGH:!CAMELLIA:!RC4:!MD5:!aNULL:!EDH
   SSLCertificateFile /etc/letsencrypt/live/gal.patheticcockroach.com/cert.pem
   SSLCertificateKeyFile /etc/letsencrypt/live/gal.patheticcockroach.com/privkey.pem
   SSLCertificateChainFile /etc/letsencrypt/live/gal.patheticcockroach.com/fullchain.pem
   SetEnvIf User-Agent ".*MSIE.*" nokeepalive ssl-unclean-shutdown
</VirtualHost>

Last but not least, when the time comes to renew, you can run a simulation using this:
./letsencrypt-auto renew --dry-run
and renew for real using this:
./letsencrypt-auto renew

Note that I configured my virtual host manually, but I believe there is a way to configure it automatically. I’m not a big fan of letting a script do some unknown magic to my stuff unless it’s really required, and since the virtual host thing is one time only (for renewals, you should be able to keep the very same configuration), doing it by hand made sense to me.

Update (2018-08-04)

At some point, letsencrypt was available in package “letsencrypt”. It’s now been renamed to “certbot”, so to create a certificate you can now use:
apt-get install certbot
certbot certonly --webroot -w /home/www/gal -d gal.patheticcockroach.com -d gal2.patheticcockroach.com

Although “letsencrypt” is still available as an alias for the command name.
Posted in security, servers, web development.


How to fix Android Studio 2.0 file permission issues

Error:Execution failed for task ':app:clean'.
Unable to delete file (or folder): [some file saved as magical admin]

You are probably here because you encountered the above-mentioned error in Android Studio, most likely on Windows and most likely with version 2.0+. A variant to this is a write error or an unzip error (Android Studio failing to extract some .aar archive because… it couldn’t clear the target folder first).
I tried several things:

  • FileASSASSIN, which tries different techniques to delete a file. It didn’t work but was able to tell me that the file was locked by an unknown program that wasn’t running anymore (at least that how I interpreted that “FileHandle”, if I recall correctly, was null)
  • LockHunter, which tries to unlock files (ditto, it failed to remove the file too)
  • and finally a working solution: disable Android Studio’s new feature “Instant Run” (search for “Instant Run” in settings and uncheck the box). And then restart (the computer, not just the Studio). The “funny” thing is that bug has been reported… for Linux on an NTFS partition

Another option, which I’ve used in the past on similar cases as a last resort, is to reboot into Linux and deletes the files from there. That’s actually my primary reason for still having a dual boot at the moment…

Posted in Android.


aToad #19: script to encode/decode a VBS

Bummer, just got myself a little virus while cleaning up a USB key a little carelessly :s
Most anti-viruses are unable to catch it (virustotal reported about 3 to 6 detections out of 56 anti-viruses, depending on the file), probably because it’s not that nasty. All it seems to do is copy itself into D:\$RECYCLEBIN (note that this is just slightly different from the real D:\$RECYCLE.BIN folder). And to USB keys (and you might want to check other external storage devices, too). And of course add itself to startup via wscript.exe. More specifically it runs this at the end:
WshShell.RegWrite "HKEY_LOCAL_MACHINE\Software\Microsoft\Windows\CurrentVersion\Run\VideoLAN","C:\WINDOWS\system32\wscript.exe /e:VBScript.Encode D:\$RECYCLEBIN\Vlc.rar","REG_SZ"
WshShell.RegWrite "HKEY_LOCAL_MACHINE\Software\Microsoft\Windows\CurrentVersion\Run\C-cleaner","C:\WINDOWS\system32\wscript.exe /e:VBScript.Encode D:\$RECYCLEBIN\Adobe.rar","REG_SZ"

It also tries to create new links to your browser(s), so that when you launch the browsers using those links it will open up some page of the site chercheztout[dot]com. Yes, apparently it’s all about getting a few bucks out of Google Search, geez…

These Vlc.rar, Skype.rar and Adobe.rar are all actually encoded VBS files. And here comes the tool this post is about: this script by arnavsharma on Microsoft TechNet was very useful to me, as I was able to decode all files after simply changing their extension from .rar to .vbe.

Last but not least, to delete this virus, all I had to do was:
– remove the run entries
– remove the files from D:\$RECYCLE.BIN
– remove the files from the USB key (both in $RECYCLE.BIN + some shortcuts called “dossier” and “nouveau dossier”)
– actually, I even formatted the USB key after that, but I don’t believe that was really necessary

Posted in A Tool A Day.


How to reorient a picture with EXIF data using PHP GD

Sorry for the briefness, lack of time strikes again.
In this code snippet, $tmpFile is the path to the image file, and for simplicity’s sake here it’s always a JPG.
We define our own function “custImageFlip” to flip the picture (and I put it at the end because it’s secondary, but if you want to use the code as-is you’ll need to put it at the top), but if your target is PHP>=5.5, you can just use PHP’s native imageflip.

Code for the switch is hugely based on code by someone in the comments in PHP’s documentation.
Code for the PHP<5.5 implementation to flip the image is from another comment in PHP’s doc.

Last but not least, a great image pack that will allow you to test all those picture rotations and flips: https://github.com/recurser/exif-orientation-examples

$tmpImage = @imagecreatefromjpeg($tmpFile);
$exif = exif_read_data($tmpFile);
//die(json_encode($exif));
if($exif!==false) {
	$ort=1;
	if(isset($exif['Orientation'])) {
		// orientation is usually here
		$ort=$exif['Orientation'];
	} elseif(isset($exif['IFD0']) && isset($exif['IFD0']['Orientation'])) {
		// but apparently it can be here sometimes?
		$ort=$exif['IFD0']['Orientation'];
	}
	switch($ort) {
		case 1: // nothing
			break;
		case 2: // horizontal flip
			$tmpImage=custImageFlip($tmpImage,2);
			break;
		case 3: // 180 rotate left
			$tmpImage=imagerotate($tmpImage,180,0);
			break;
		case 4: // vertical flip
			$tmpImage=custImageFlip($tmpImage,1);
			break;
		case 5: // vertical flip + 90 rotate right
			$tmpImage=custImageFlip($tmpImage,1);
			$tmpImage=imagerotate($tmpImage,-90,0);
			break;
		case 6: // 90 rotate right
			$tmpImage=imagerotate($tmpImage,-90,0);
			break;
		case 7: // horizontal flip + 90 rotate right
			$tmpImage=custImageFlip($tmpImage,2);
			$tmpImage=imagerotate($tmpImage,-90,0);
			break;
		case 8: // 90 rotate left
			$tmpImage=imagerotate($tmpImage,90,0);
			break;
	}
}

// ImageFlip from https://php.net/manual/en/function.imagecopy.php#89658
function custImageFlip($imgsrc,$mode) {
	$width=imagesx($imgsrc);
	$height=imagesy($imgsrc);

	$src_x=0;
	$src_y=0;
	$src_width=$width;
	$src_height=$height;

	switch ($mode) {
		case '1': //vertical
			$src_y=$height-1;
			$src_height=-$height;
			break;
		case '2': //horizontal
			$src_x=$width-1;
			$src_width=-$width;
			break;
		case '3': //both
			$src_x=$width-1;
			$src_y=$height-1;
			$src_width=-$width;
			$src_height=-$height;
			break;
		default:
			return $imgsrc;
	}
	$imgdest = imagecreatetruecolor ($width,$height);
	if(imagecopyresampled($imgdest, $imgsrc, 0, 0, $src_x, $src_y , $width, $height, $src_width, $src_height)){
		return $imgdest;
	}
	return $imgsrc;
}

Posted in PHP, programming, web development.


aToad #18: HexChat and FileASSASSIN

Respectively, open source (FLOSS) IRC client and tool to delete sticky files on Windows

Again a “Toad” with 2 tools, because there isn’t much to say about them. I installed HexChat today because I needed to join an IRC channel on Freenode and the web-based IRC client I used to use was down. I’ve never been a big fan of IRC because I find it kind of messy so I’ve always stuck to web clients, but I find HexChat easy enough to use and frankly *a lot* faster than a web-based client lagging in the browser.
A few cool features: can be configured as a portable installation (saves settings in program folder instead of the system folders’ mess), can pin servers and channels to auto-connect to them on startup (kind of obvious I suppose, but it’s the kind of thing I didn’t have in the web client…).
HexChat is a desktop client with a GUI, if you’d rather have a console client or something, you might find what you want on this Top 4 open source IRC clients post where I read about it.

The second tool is FileASSASSIN by Malwarebyte, and unfortunately it’s just freeware. It’s a nice little tool to help you delete tough files.
I’ve been doing some Android development lately, and at some point I hit one of those horrible Windows bug where some poorly conceived piece software generates a file that’s impossible to delete and chokes on it itself (and when you try to delete it manually from Windows Explorer, Windows tells you you don’t have permission to do this, even when you try to run the command as Administrator). In this case, it lead to an Android Studio/IntelliJ error looking like “Cannot save file: Cannot delete temporary file ___jb_old___“. That seems to be a long-running joke (the bug was reported over 4 years ago and is actually marked as fixed because now “there is a UI option (File | Settings | Use “safe write”)”), but that’s the kind of joke where I usually waste 10 minutes to reboot the computer into Linux, delete the file from there, and then boot back into Windows.
FileASSASSIN tries a few tricks to unlock the file and tries to delete it. In my case it failed to delete the file directly, but it also offers to mark the file for deletion at reboot, which worked fine. So I still had to reboot, but skipped the boot into Linux part (also convenient if you don’t want to have a dual boot just to handled such annoyances…).
If it doesn’t work out for you, maybe try one of the many other file deletion tools listed in this post.

Posted in A Tool A Day, Windows.


Dealing with the new permission system in Android 6

My crash monitor (ACRA with Tracepot hosting) recently caught a crash saying something along those lines: “Permission Denial: opening provider com.android.providers.contacts.ContactsProvider2 […] requires android.permission.READ_CONTACTS or android.permission.WRITE_CONTACTS”.

Turns out the app wasn’t checking for permission before trying to read contacts and just assumed it was granted, causing a crash when it wasn’t upon calling context.getContentResolver().query( ContactsContract.CommonDataKinds.Phone.CONTENT_URI, PROJECTION, null, null, null);
This issue became obvious with Android 6, but it actually already exists in lower custom versions, provided they have an improve permission system (like CyanogenMod of OxygenOS) and that the user used it to remove the app’s read contact permission.

I found the core solution in this post on Stackoverflow, still I thought I’d share my slightly different implementation. The function to call is tryReadContact(), which will then handle the permission asking, etc

protected void myReadContactFunction() {
	// this is my function which needs to have READ_CONTACTS permission
	// I use a try catch so that it can always run (if permission denied, it returns an empty result instead of crashing)
	Map contactsMap = new HashMap<>();
	ContentResolver cr = c.getContentResolver();
	Cursor cursor=null;
	try {
		cursor = cr.query(ContactsContract.CommonDataKinds.Phone.CONTENT_URI, PROJECTION, null, null, null);
	} catch(Exception e) {
		// we land here if no permission to read contacts
		Log.v("myReadContactFunction","reading phone contacts denied");
		return contactsMap;
	}
	if (cursor != null) {
		// do read contacts
	}
	return contactsMap;
}

protected void tryReadContact() {
	if(ActivityCompat.checkSelfPermission(this,Manifest.permission.READ_CONTACTS)==PackageManager.PERMISSION_DENIED) {
		ActivityCompat.requestPermissions(this, new String[]{Manifest.permission.READ_CONTACTS}, READ_CONTACT_REQUEST_CODE);
	} else {
		myReadContactFunction();
	}
}

@Override
public void onRequestPermissionsResult(int requestCode,@NonNull String[] permissions,@NonNull int[] grantResults) {
	// NB: the switch is here to demonstrate support for multiple types of permission requests
	switch (requestCode){
		case READ_CONTACT_REQUEST_CODE:
			if (grantResults.length == 1 && grantResults[0] == PackageManager.PERMISSION_GRANTED) {
				Log.v("PeopleListActivity", "Contact permission has now been granted.");
			} else {
				Log.v("PeopleListActivity", "Contact permission was NOT granted.");
			}
			// in both cases we call myReadContactFunction, since the function reads more than phone contacts and can deal with non-granted permissions
			myReadContactFunction();
			break;
	}
}

The camera permissions are annoying too now. Got this error “android M java.lang.SecurityException: Permission Denial: starting Intent […] android.media.action.IMAGE_CAPTURE […] with revoked permission android.permission.CAMERA”.
We could just do the very same thing as above, but the Android documentation recommends to use intents rather than asking for permission whenever it is appropriate, and it was the case for me there. In such case, you must NOT declare the permission related to the intent, or if you do then you still have to request the permission: “if you app targets M and above and declares as using the CAMERA permission which is not granted, then attempting to use [ACTION_IMAGE_CAPTURE] will result in a SecurityException” (source ACTION_IMAGE_CAPTURE documentation). The reason for this makes sense, this is to avoid user confusion on an app appearing to be able to use the camera even after being denied the camera permission (source).
So basically, in my case all I had to do was to remove <uses-permission android:name="android.permission.CAMERA"/> from AndroidManifest.xml, and just call my new Intent(MediaStore.ACTION_IMAGE_CAPTURE) as I did before.

Posted in Android, programming.


How to remove Google from Opera Speed Dial

So I finally upgraded Opera, as even though version 12 was nice, Presto got definitely rusty. It shockingly lacks tons of customizations that used to be its strength, but I guess it’s still better than Chrome.

Something annoying is that they hid some settings. Namely, there are 2 kinds of hidden settings: the “advanced” settings and the “power user” settings. To unlock the advanced settings, go to Settings => Browser, and then scroll to the bottom and check the “Show advanced settings” box. This enables options such as restoring a real, standalone search bar and showing the full URLs in the address bar.

But for something as trivial as getting rid of Google, you need to access the “power user” settings. And they hid it really well, you actually need to type a freaking code to access it: when you are still in settings, type the following keys: Up Up Down Down Left Right Left Right B A. If you did it right, you’ll get a popup to confirm that you want to unlock those settings. That popup may sound a bit scary for instance they say “These settings are hidden for a reason. They can severely mess up the browser and we can take no responsibility for the stability or performance of the product after proceeding”. But this seems to be pretty BS: I only found TWO “power user” settings, one of which being the famous checkbox to hide the search box in speed dial (yes you can remove the Google serch box but you can not replace it with another search engine, thanks for the anti-feature Opera).

While you’re there, maybe don’t forget to check the “Always show power user settings” box, otherwise you’ll need to type the code every time you want to access them.

Posted in Opera.