Skip to content


Solving “Element link is missing required attribute property”

I use the W3C validator to check my HTML 5 documents, and somewhat recently this new error appeared, saying “Element link is missing required attribute property.”
After a bit of research, it turned out that, if a <link> tag is NOT inside the <head> section of the document but is in the <body>, then the validator wants an additional property attribute. Probably even easier with an exemple:

When inside the <head> section you would write:
<link rel=”stylesheet” type=”text/css” href=”css/myStyle.css”/>

But when inside <body> you’ll write:
<link property=”stylesheet” rel=”stylesheet” type=”text/css” href=”css/myStyle.css”/>

And voilà, no more error in the validator 😉

Posted in web development.


A possible workaround to Alt Gr not working in Windows

Since a few months, I’ve had that issue where Alt Gr randomly stops working in Windows 7. This is a major hassle because Alt Gr is needed for very common characters when programming (#, {, }…), and also, of course, for “@”. A first solution is to use Ctrl + Alt + [key] as a replacement for Alt Gr + [key], but this isn’t nearly as convenient.

According to various posts here and there, this can be caused by third party software, notably some drivers, stealing keyboard shortcuts. In my case I couldn’t identify a culprit: the issue appeared apparently without a recent update, shutting down running stuff didn’t help. Also the issue is really random (sometimes it occurs, sometimes it doesn’t) and is usually solved simply by rebooting.

I haven’t found a permanent solution, however I found a method much faster than a reboot: switching keyboard language back and forth. I have to keyboards layouts installed, and when I switch from one to the other (NB: the shortcut to do so is Ctrl + Shift), Alt Gr starts working again. So double switch brings me back to my current layout, with Alt Gr working. And so far, it then never disabled again until at least the next reboot.

Of course if you find a more permanent solution, such as a utility to find which program is responsible for causing this mayhem, I’d be glad to hear it in the comments.

Posted in Windows.


aToaD #14: ideone and codeboard

Well that’s 2 tools instead of one, but they seem a bit overlapping and a bit complementary at the same time.

Ideone.com lets you submit small code snippets in order to test them (live compilation and run). They support about 60 languages (I didn’t count myself, but that seems quite accurate from their impressive list), from the classic C(++)/PHP/Java/Javascript/… to the more uncommon R/Octave/Scala/… and even quite a few I had never heard of before (bc/Unlambda/…)

Codeboard.io lets you work online on whole projects. They seem to be very recent (a project I created about a month about was ID 1500-ish while another project I created a few days ago was ID 4500-ish), and they only support 6 languages so far: C, C++, Eiffel, Haskell, Java, Python.

Nothing much to add… just give them a try whenever you need a quick way to test your code without setting up a whole development environment 😉

Posted in A Tool A Day, programming.


Bloquer les pubs sur OVS le retour – DEFCON 1

(NB: exceptionally, this article is written in French because it’s targeted at a French, non-English speaking audience – sorry for the inconvenience)

Attention script Fiddler à mettre à jour, cf mon dernier commentaire. De plus, avec le nouveau bloquage mise en place ajourd’hui (2016-08-22), Fiddler est la seule méthode qui marche à ma connaissance. (oui pour ceux qui lisent en diagonale, ce post date à l’origine de mai 2015)

Il y a quelques mois, OVS chamboulait son système anti-anti-pub. Après quelques recherches, j’ai mis au point une méthode de contournement lourde mais imparable. Cependant entretemps OVS avait déjà allégé sa méthode, permettant un contournement simple, d’abord par l’usage de Ghostery seul à la place de Adblock + Ghostery ou d’Adblock seul, puis par la simple mise à jour des filtres AdBlock, qui ont été adaptés par le mainteneurs du projet. Je me suis donc contenté de publier ces conseils, + un script Greasemonkey juste pour le fun.

Seulement voilà, ce matin surprise, Ghostery (ou Adblock Plus ou Edge avec les filtres mis à jour) sont détectés à nouveau. Il est temps de recreuser un peu les méthodes.

MAJ du 4 mai 2015 : la méthode 1) ne marche pas encore, la méthode 2) ne marche plus… reste la méthode 3) qui marche très bien : la seule raison pour laquelle je l’ai mise en 3) et qu’elle est un peu complexe pour un novice en informatique

1) Solution triviale mais pas immédiate, et incomplète

Attendre qu’AdBlock mette à jour ses filtres 😀

2) Solution rapide, facile mais incomplète également

Utiliser Ghostery et désactiver AdBlock. Dans Ghostery, mettre en liste blanche pour OVS le tracker “SMART Adserver”.
Screenshot parametres Ghostery
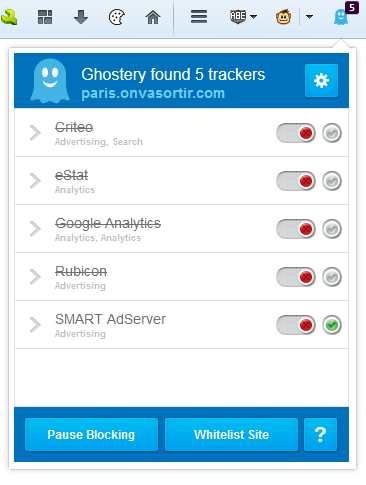
Vous serez désormais pistable par smartadserver.com, mais vous ne verrez pas ou peu de pubs.

2.bonus) Détails techniques pour les curieux

Une des 2 protections anti-anti-pub consiste à créer un object smartadserver et à vérifier son existence:

sas.setup({ domain: 'http://ww62.smartadserver.com'});
if(typeof sas === 'undefined'){document.location='ovsadblock.php?test=sas&nav='+window.navigator.userAgent;}

La seconde est dans le même genre, mais teste simplement un objet différent:

if (!(document.getElementById("my-smartads")))
document.location='ovsadblock.php?test=jrt&nav='+window.navigator.userAgent;

3) Solution lourde mais ultime

Avec cette méthode, vous pourrez toujours vous en sortir même quand 1) et 2) seront, éventuellement, mis en échec (il faudra juste adapter le script le cas échéant). En revanche elle nécessite l’installation d’un logiciel supplémentaire, voire d’un navigateur aditionnel si vous ne voulez pas interférer avec votre surf sur les autres sites. Par souci de complétude je vais donc ici présenter la méthode avec l’utilisation d’un navigateur aditionnel.

3.1) Installer Firefox ou un dérivé (fork)

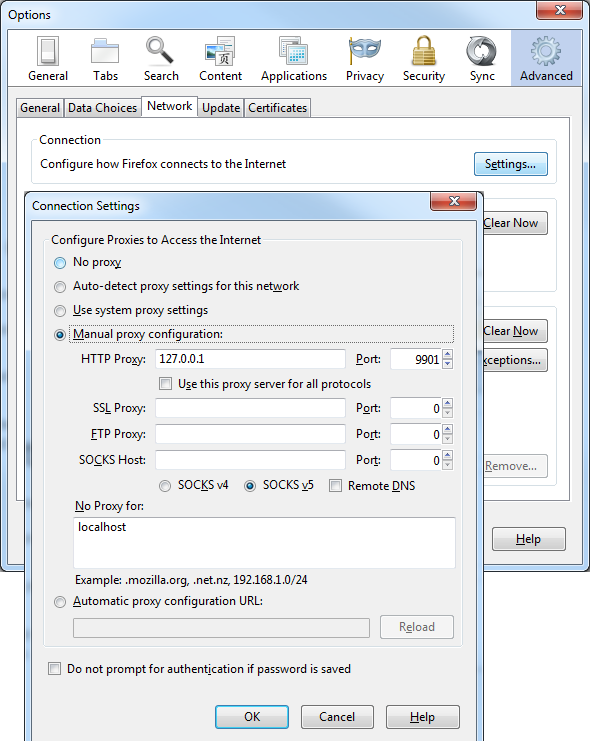
Je connais 2 grands forks de Firefox qui ont la caractéristique intéressante de pouvoir tourner en parallèle avec lui: Cyberfox et Palemoon. Selon ce que vous utilisez déjà, installez un de ces 3 navigateurs, puis configurez-le, dans les paramètres réseau, pour utiliser un proxy HTTP 127.0.0.1:9901 (la capture d’écran ci-dessous provient de Firefox 37).
Screenshot parametres proxy HTTP Firefox

3.2) Installer Fiddler

Fiddler est un freeware qui permet, entre autres, d’intercepter et modifier le traffic web. Nous l’utiliserons donc pour intercepter le traffic provenant d’OVS et retirer le(s) code(s) de protection anti-anti-pub avant de charger les pages dans le navigateur. Ainsi, la protection saute et on peut naviguer tranquillement 🙂

Fiddler est téléchargeable gratuitement ici. Le site demande un e-mail, mais vous pouvez laisser la case vide.

Installer Fiddler (à l’heure où j’écris ces lignes, la version actuelle est 4.5.1.0), puis dans Tools → Fiddler Options → Connection, configurer “Fiddler listens on port:” à 9901. Cf la capture d’écran ci-dessous.
Screenshot parametres Fiddler

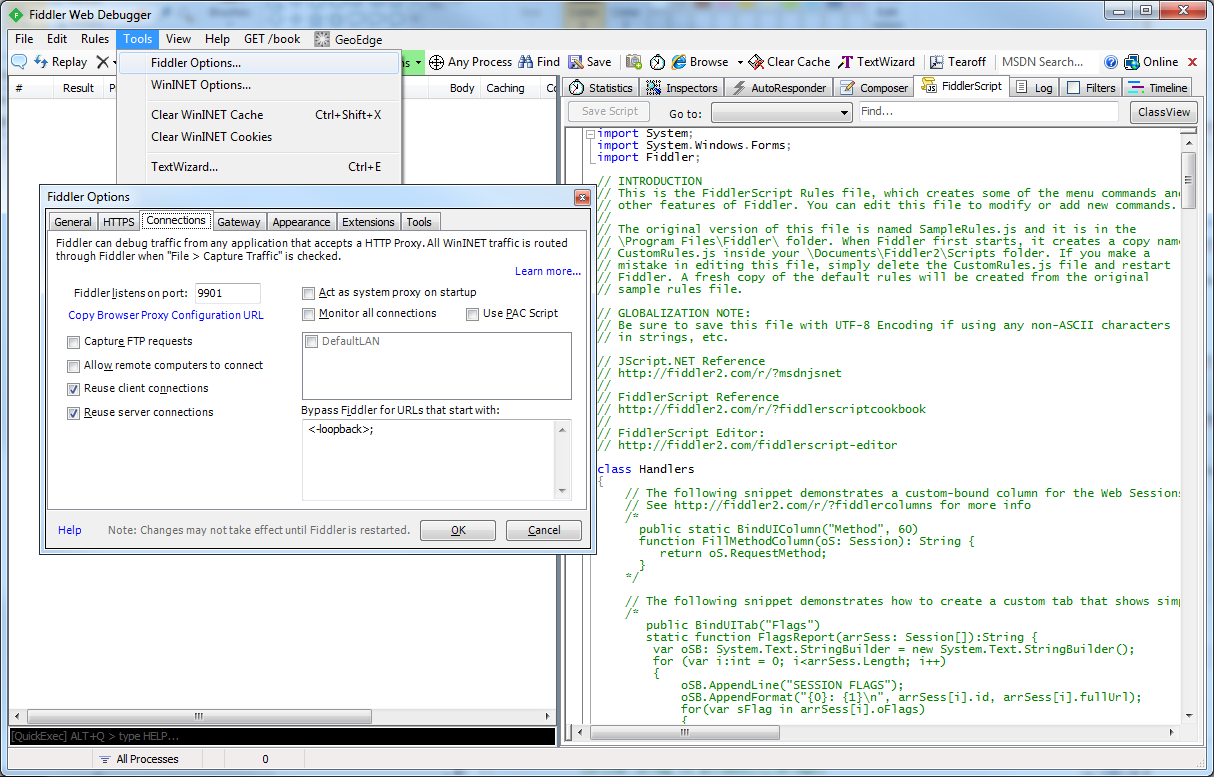
Dans la fenêtre générale, allez sur l’onglet “FiddlerScript”, et remplacez le contenu du script par le contenu de ce fichier: OVS-Fiddler-CustomRules-20150501.js.txt. N’oubliez pas de cliquer sur “Save Script” ensuite (vous devriez entendre un bip).

Et voilà, le tour est joué, vous devriez pouvoir charger OVS dans votre nouveau navigateur (n’oubliez pas d’y installer AdBlock et/ou Ghostery, selon vos préférences, sinon évidemment vous auez les pubs :D)

3.3) Remarques (lisez si ça ne marche pas) et détails additionnels

Ca fait longtemps que j’ai réalisé ma première installation de Fiddler, du coup je ne me rappelle plus des paramètres par défaut. Il est possible en particulier que le script modifié ne soit appliqué qu’au redémarrage de Fiddler (donc si le script ne semble pas appliqué, redémarrez Fiddler, ça l’appliquera alors à coup sûr).

Il y a, dans la barre d’outils, un gros bouton “Stream” (pas visible sur ma capture d’écran car le menu ouvert est devant) : assurez-vous qu’il est décoché. Sinon, le traffic sera envoyé au navigateur AVANT d’y appliquer les modifications du script (oui, moi aussi ça me semble un peu idiot comme paramètre… mais bon c’est comme ça).

Si malgré tout, ça ne marche toujours pas, n’hésitez pas à poser vos questions en commentaires (avec captures d’écran si possible, vous pouvez les héberger facilement sur hostingpics.net par exemple).

Last but not least, à propos de mon script Fiddler, en fait la seule zone qui change par rapport au script par défaut, c’est le contenu de static function OnBeforeResponse, autour de la ligne 278. C’est là que sont réalisés les traitements sur la page avant de la transmettre au navigateur.

Enjoy! 🙂

Posted in privacy, programming.

Tagged with .


Epson Perfection 1660 Scanner Driver for Windows 7 64 bits

So I have this very old scanner (Epson Perfection 1660 PHOTO), which still works great but for which no drivers are provided for Windows 7. Somehow, a long time ago, on an old PC of mine which I still have, I did manage to install some kind of driver, on Windows 7. I really don’t remember how/where I found it, though (maybe I managed to install a version targeted at another OS – but I tried that again and it didn’t work), and I wasn’t able to find the proper installer.

Gladly, there are programs that allow you to extract installed drivers. The one I used is Double Driver. Download links on the official website are broken, so I mirrored the latest version (4.1.0 portable) here. There is also Driver Extractor, but I find it a lot less convenient (I didn’t even manage to find the scanner in their “ordered” list).

Finally, if you need the Windows 7 x64 drivers for your Epson Perfection 1660, here is the version extracted by Double Driver. I didn’t manage to install it directly. What I did was I plugged the scanner, then I went to “devices and printers”, right-clicked the scanner, then PropertiesHardware tab → Properties button → Driver tab → Update Driver (or just “Update”) button, then chose “browse my computer for driver software” and navigated to where I unpacked my archive with the driver. The wizard should then pick the right file and be able to install the driver.

Driver version is 3.0.4.0 and is dated 2006-12-21 as shown in screenshot below.

Screenshot of Epson Perfection 1660 PHOTO driver tab

PS: from what I read while looking for a way to obtain the driver (before getting the idea to grab it from the old PC), it seems fairly likely that this driver may also work on Windows 8 or 8.1.

Update (2018-06-16)

I randomly stumbled on that post while doing some general site maintenance and noticed megabitload, which I used to host the files, is now down (RIP 🙁 ). So I just reuploaded everything on my own server, that should last longer ^^

Posted in drivers, Windows Se7en.


LaTeX: solving “pdflatex.EXE (file t1-zi4r-0): Font t1-zi4r-0 not found”

Got that puzzling error, “pdflatex.EXE (file t1-zi4r-0): Font t1-zi4r-0 not found“, which was blocking me when trying to build an R package. At a higher level in the code, the error message was a more obscure “Warning: running command Rcmd.exe Rd2pdf had status 1“.

Anyway, that second one means there’s been an error, and the first one is the clue: a font is missing. Problem: Latex is supposed to fetch missing files on the fly, and for some reason in this case it didn’t. No obvious solution to this, LaTeX was working very fine apart from that. So I just tried the random thing to do: update it (hadn’t updated it since install time about 2 years ago – oops).
And that turned out to be it. The install was so old that I needed to run the update program twice, once to update the update program and core, and once to perform the hefty amount of package updates. After the update, running the R package builder again made LaTex successfully fetch the missing font (said hello to the firewall 😉 ), and all worked. Tada 🙂

Posted in LaTeX.


How to enable hibernate mode in Windows 7

I’m a HandBrake occasional user and I’m having trouble making my computer suspend operation when an encoding job is running: when in sleep mode, handbrake keeps running (!!), emptying the battery about just as fast as when not in sleep mode (and making about just as much noise).

I later read that there are actually 2 different “suspend” modes: hibernate and sleep. To summarize the difference very quickly (more details there), sleep mode keeps the RAM powered and suspends most computer operations, while hibernate is supposed to write the RAM to disk, shutdown the computer completely and then load the RAM with what was saved on the disk when you turn the computer back on.

Hibernate and sleep can both be access from the start menu, in the drop-down button next to “Shut Down”. Except that for some reason, in my case hibernate didn’t show. Apparently in such (common) case, you need to enable it first, and there’s no GUI for that: you need to use the command line. In start menu, run “cmd” (without the quotes – or [windows key] + R works too) and then type powercfg /hibernate on.
If after that you still don’t have the hibernate option (wasn’t my case), reportedly you’ll need to disable hybrid sleep mode in the power options : in start menu, search for “edit power plant” then click “change advanced power settings” and browse to Sleep → Allow hybrid sleep.

Now you should have the hibernate option. If you don’t, you may want to check Microsoft’s FAQ entry about that, but I found it quite helpless.

Last but not least, hibernate seems to crash my computer (and not suspend handbrake anyway), so in the end that was a bit useless :/

Update (2015-03-15): not only Handbrake seems to defeat hibernation, also hibernation will create a huge file to store the RAM’s content. This file, C:\hiberfil.sys will always take up the equivalent of a large proportion of your RAM’s size (I have 20 GiB RAM, the hiberfil.sys file is 15 GiB). So when you don’t need it and want to reclaim some disk space, I believe it’s worht disabling it 😉

Posted in Windows Se7en.


Tools to download APKs from Google Play Store

Android is the most brilliant example of how to do a closed system based on something open. The complete entrapment of APKs on the Play Store, even though it’s “soft” (developers could distribute their own APKs themselves, or at least on alternative stores, but most of them don’t bother), is one among the many ways Google uses to try and track everyone.
Gladly, some people worked on tools to manually fetch APKs. They remain limited due to all the restrictions imposed by Google, but are still better than nothing.

The first kind of tools requires you to have a device with Google services installed and linked to a Google account. I’m not really sure how useful this is, then: sure you can download APKs, but you are still tracked by the GMail man and you still have Google stuff on your device. Still, here is a brief list (I only found 2):

Long story short, those programs run locally on your PC, you need to provide them with your device ID and your Google account (I’d recommend creating a Google Account just for the occasion – if you do have a normal one even though you shouldn’t :p), and then they pretend to be your smartphone and grab what you want from the Play Store (I think it doesn’t work with paid apps though).
I tried APK downloader about 2 years ago, just after I rooted and “cyanogened” my phone, it worked fine. But since then I lost my device ID (:x) or maybe it got unlinked from my Google account anyway. Or maybe I forgot which Google Account I used to fetch APKs. I don’t know why I didn’t save those data. Duh.

Anyway, the second kind of tools is quite the same principle, although they are provided as a web service and you don’t have to use your own device ID and Google account as the service provides some. Sadly there isn’t a lot of them either:

These will definitely not grab paid APKs: as you can understand, they probably don’t want to get into piracy issues. My advice on paid APKs is buy them from some other shop so as to discourage the Play Store monopoly. Aptoide, Amazon, SlideME… you have plenty to choose from and Wikipedia has a list. Enjoy.

Update (2018-07-16)

A spam comment made me come back to this post. Since the original version, I also found another tool which can achieve kind of the same purpose, Yalp Store.
It’s an phone application (let’s use the full, proper-ish word for a change – jeez I remember the time when programs where called programs or software), and it doesn’t directly allows you to download APKs but it allows you to install apps from the Play Store without using a Google account (it contains a stock Google account). And it can also be used, via some trivial manipulations, to get APKs:
1) you can get the APK of your installed apps
2) when you use this tool to install apps, the process is currently in 2 steps, the first is downloading the AOK to your phone’s Download folder (and the second is running the installer). So, even though Yalp doesn’t tell you so, you can grab APKs without installing them by just doing the first step (download) and then getting the APK in the Download folder. Yalp might behave a bit strangely for the app in question if you then remove the APK from the Download folder, though, so maybe avoid that. (what happened for me was that, after I deleted the APK of downloaded app X, Yalp believed if was installed, and offered to run it or remove it, but instead of app X, it’s Aptoide that was ran or removed when I chose those options :s)

Posted in Cyanogenmod, Google, software.


phpThumb: how to switch error messages on

phpThumb is a free, open source (GPL) image thumbnail generator. Even though the site feels like the beginning of the century, development is still going on as can be seen on Github.

This software has weird configuration options to enable the display of errors. To be able to see errors, you should set the following in phpThumb.config.php:

$PHPTHUMB_CONFIG['error_die_on_error']          = true;     // die with error message on any fatal error (recommended with standalone phpThumb.php)
$PHPTHUMB_CONFIG['error_silent_die_on_error']   = false;    // simply die with no output of any kind on fatal errors (not recommended)
$PHPTHUMB_CONFIG['error_die_on_source_failure'] = true;     // die with error message if source image cannot be processed by phpThumb() (usually because source image is corrupt in some way). If false the source image will be passed through unprocessed, if true (default) an error message will be displayed.

But also, and this is the tricky one as it’s away from the other error parameters, you need to enable (or rather, “not disable”) debug mode:

$PHPTHUMB_CONFIG['disable_debug'] = false;

Now phpThumb’s output will still seem like an image to your browser, but if you save it and open it with notepad or equivalent, you’ll be able the read the error message.

Posted in software, web development.


aToaD #13: regex101

Writing regular expressions about always give me a headache… You probably know about the nice regular-expressions.info website, containing a lot of useful information and what seems to be a fairly exhaustive reference.

Yet it misses a useful tool: a way to test your regex. That’s where regex101 (“Regular Expressions 101”) comes in handy. You simply enter your regular expression, pick modifiers (help available for those), then enter some text and see if the regular expression matches it.
Other interesting features:
– quick regex reference in the bottom right corner
– supports regex particularities of 3 languages (PHP, Javascript and Python),
– (very) basic code generator in those languages to use your regular expression
– you can create unit tests
– you can save your stuff either via unique URL or by using a Github or Google (yuck) account. I haven’t tested this, though.

In a somewhat related area, Code Beautify will help you reformat your code in a nicer way. Works with quite a few popular languages (JSON, XML, JavaScript, and many more)

Posted in A Tool A Day.