Skip to content


aToaD #12: KeePass and KeePassX

If you follow the IT news closely enough, not a week goes by without a story of compromised credentials. For instance, a recent, really big one was reported there on Hold Security, with more than a billion credentials stolen from various vulnerable websites. Security being a race between those who make it and those who break it, I think we’ll always see such kind of news. Maybe fewer as website operators grow more careful, but still some.
Meanwhile, the impact of such hacks can be minimized by following trivial recommendations you probably read about many times already: use strong and unique passwords. Strong so that they can’t be bruteforced even if the site didn’t hash them very strongly (like, md5 with no salt), and unique so that even if the hacker eventually managed to get the clear-text version (non hashed storage – bad but still occurs more often than you think -, or if the server was compromised enough to capture passwords as people logged in), then it will only let them steal one account of yours, not all of them.

Those recommendations are trivial, yet many people know them but still don’t follow them. And if you’re one of those people, I suppose you know why: it’s just impossible to remember so many passwords. As I’m writing those line, my password database contains over 500 credentials… There’s just no way to remember that. The solution resides then in… a password manager. The concept is simple: put all your unique passwords into a database, and encrypt it with a single, very strong password which you must not forget. Down from 500+ to only one big password to remember, sounds like a good deal.

Many services provide that. You probably heard of LastPass, maybe also RoboForm. Those are close source (you usually want to avoid that in cryptography), commercial solutions. I’m not sure about RoboForm, but LastPass is cloud-based and when they have an outage you lose access to your passwords (happened about a week ago).
My personal favorite is KeePass, which is free and open source, and stores things locally, not in the cloud (you can should then back up the KeePass database using your favorite backup service(s) – possibly SpiderOak?). Unfortunately, it only works natively on Windows (although it should work on Linux and Mac OS via Mono). If you want a native solution under Linux, a possibility is then KeePassX, which is sadly still in alpha stages (although it worked pretty fine last time I tried it, it mostly lacks polishing and richer features).

For an extra layer of security, you can also configure your firewall to prevent KeePass from accessing the network. And each KeePass release is signed with the OpenGPG key of one of the developers, you can check that signature too (see this old post if you have no clue about OpenPGP).

Update (2014-08-21)

Well, as I was saying as an introduction, if you follow the IT news, you see those database hacks on a regular basis. Here’s one which hit the news just today: Data breach at UPS Stores in 24 states (CNN).

Posted in A Tool A Day, security.


How to give different headers to different pages in LibreOffice

Following my previous adventures with LibreOffice, I wanted to place chapter names in headers, which means different pages would have different headers… which doesn’t seem to have an obvious solution, since the way headers (and footers) usually work is “same stuff for every page” (even though this can mean same automatic field with a different value on every page).

Anyway, LibreOffice provides a way to set different headers via page styles. The “Style and Formatting” dialog (accessible via F11), which you probably already use to format text at the character or paragraph level, also contains a “Page Styles” part. When you edit page styles, you can set specific headers, but also footers, margins, and even paper format.

The way I worked was to create one chapter per file, then combine all files manually. In each file, I defined a chapter-specific page style (like you would define any other style), which I then imported into the merged file (in the “Style and Formatting” dialog, top-right menu button them “Load styles” and import from file – don’t forget to check “Pages”), before copy/pasting the content. I’m not sure if there’s a better way or not, but to switch between different page styles in the global document, I used page breaks (Insert → Manual break), where you can specify the page style to be used after the break (default value being “[none]”).

Useful information on the LibreOffice wiki too: Defining Different Headers and Footers

Posted in LibreOffice & OpenOffice.


[R] How to fix package installation failure on “checking for xml2-config”

I’ve recently had to set up a secondary computation server running R-project. Unfortunately, like all my servers, it runs under Linux, and R is a PITA to run under Linux. Notably, packages must be compiled on the machine: not only this is long, but also it requires tons of programming-related dependencies (GCC and such), and, well, it tends to fail sometimes.

While I’m at it, here are the repositories to be added to /etc/apt/sources.list in Debian 7:

deb http://mirrors.softliste.de/cran/bin/linux/debian wheezy-cran3/
deb-src http://mirrors.softliste.de/cran/bin/linux/debian wheezy-cran3/

So, I wanted to install a few packages from Bioconductor, notably the “GOSim” package. But installation failed on the “XML” package dependency (yes, it’s a package named “XML”), with the following apparent issues:
checking for pkg-config... no
checking for xml2-config... no

So apparently, some dependencies were missing despite that infamous package manager system which I seem to be the only one to hate. The first dependency was trivial to fix:
apt-get install pkg-config
But for the second one, that trick didn’t work.

I eventually found on some Stackoverflow page that the relevant package is libxml2-dev, so:
apt-get install libxml2-dev

And that’s it, you should now be able to install your package… or move to the next missing dependency :-p

Posted in R (R-project).


How to avoid landing (too much) in spam folder when using Postfix: customize your hostname

Now that I changed e-mail provider for Fastmail, I have to deal with a more traditional anti-spam protection. Basically, SpamAssassin with quite default features. This is a bad thing because that piece of software just doesn’t seem to learn properly. Notably, the Bayes filter is totally underpowered, as even when fully trained it can’t decrease the score by more than 1.9, which isn’t even as high as some basic violations like CK_HELO_DYNAMIC_SPLIT_IP (1.499) or HELO_DYNAMIC_IPADDR2 (3.607). But this is also a good thing, because it forces me to actually look into the problems instead of just having them “fixed” by pushing the “not spam” button a few times to teach Hotmail or Gmail not to send those e-mails to the spam folder.

So, I had those 2 violations HELO_DYNAMIC_IPADDR2 and CK_HELO_DYNAMIC_SPLIT_IP, which I hadn’t had before at my previous hosts. After a quick search, it seemed that this was caused by my hostname looking too much like the one of an ISP. For instance, my ISP gives reverse DNS looking like 22-22-33-126.rev.numericable.fr, and my server host gives, well pretty much the same. Like 44-122-133-9.blue.kundencontroller.de. For SpamAssassin, this looks too much the same: the HELO address, 44-122-133-9.blue.kundencontroller.de, seems like a residential, end-user computer, not like a proper server.

The fix to this is simple: configure your hostname so that it’s not your host’s default anymore (and make sure your new name doesn’t look like an IP either). I suggest simply taking one of the domain names already hosted on your server (you have to make sure that the relationship IP < -> domain name works in both directions). For instance, I set mine to patheticcockroach.com. Probably even better (more convenient for migrations) would be to had a third level domain name assigned to it, like server1.patheticcockroach.com

To configure postfix to use the new hostname, change that in /etc/mailname. (don’t forget to postfix reload or postfix stop and postfix start to apply changes).
You should also be able to configure the reverse DNS associated to your server in your host’s control panel. You’ll then have to wait for it to propagate, however you should also be able to quickly see the change with some specific tools like DomainToosl, for instance: http://whois.domaintools.com/81.7.10.145 (the hostname is indicated as “Resolve Host”).
I’m not 100% sure both parts are useful, yet I think it’s a good idea to make sure the Postfix HELO address matches the server’s reverse DNS.

Edit: actually, the most important part seems to be the myhostname = stuff.com line in /etc/postfix/main.cf.

Posted in Linux, postfix, servers.


Tips to captioning figures and tables in LibreOffice

I’ve recently had the need to write in a format close to a scientific article within LibreOffice. However, I quickly encountered 2 issues related to figures and tables:

  1. When adding/inserting a caption for an image, there’s no “Figure” category
  2. When adding/inserting a caption for a table, I didn’t find it obvious to place the caption above the table.

First thing first, to add a caption for a picture or a table, just right-click on it (might take a bit of try and error for table) an select “Caption” in the context menu.

About point 1), bug reports are in the work (cf my first link), but meanwhile it’s possible to simply create a custom type that you’ll call “Figure” (you can manually edit the item in the “category” drop-down list).
Dialog box for caption creation
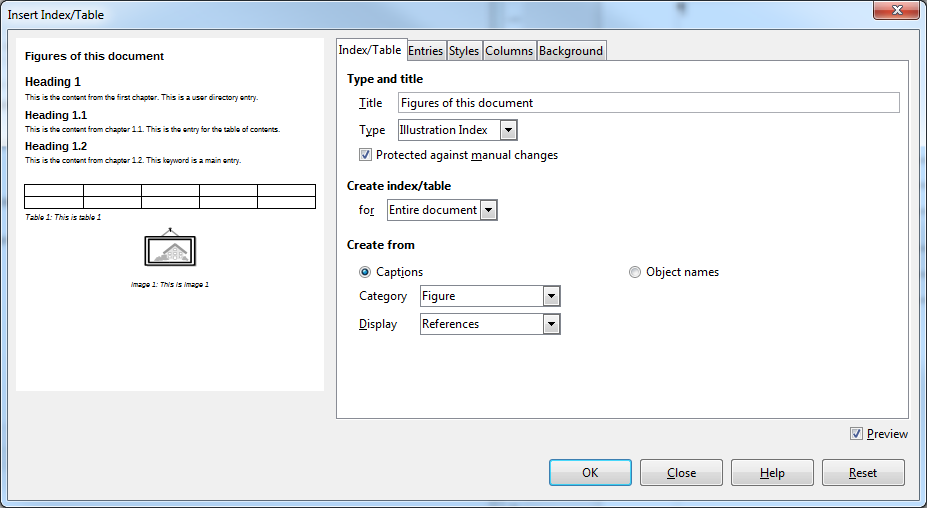
This manually-created type will then be available for auto-index creation (Insert → Indexes and Tables → Indexes and Tables):
Dialog box for figures index creation

About point 2), well maybe you already noticed it in my first screenshot: in the caption creation dialog, you have, as the last option (the one just above the preview), a “position” item, which can be either “below” (default) or “above”. Note however that “above” is a bit bugged at the moment: the text below your table will be moved upwards by as much pixels as the space taken by the caption. The workaround is simply to add an appropriate amount of line breaks after your captioned table.

Posted in LibreOffice & OpenOffice.


Mac OS – Solving can’t install Titanium CLI & Alloy (Invalid password)

Titanium is this thing, which allows for cross-OS mobile development. I recently had to compile an application written in Titanium for iOS. I’ll skip the highly weird “installation” method for Titanium (the installer itself unpacks some stuff and asks you to manually drag and drop it into the application folder). When running Titanium for the first time, it will try to update as well as to install dependencies. To do so, it will ask for your account password. And if you’re unlucky like me, your proper account password won’t work. The issue was reported there, but they only provided various workarounds which I don’t find very satisfying (notably due to their lack of simplicity).

First, a more accurate description: when your Mac gives you a password prompt, normally your name appears as “FirstName LastName”. In the case of this issue, my name would appear as my login, ie “lastnamefirstname”. I observed that on 3 machines: the 2 where the issue occurred had “lastnamefirstname”, the one where it worked had “FirstName LastName”. The accounts with or without the issue all apparently had full admin permissions (according to Apple → System Preference → Users & Groups).

Now, the solution for me was to set up the root password. That password isn’t set by default (or at least it’s unknown). And funny thing, this was just like setting the root password on any Linux distribution (I think I made a post about that for Ubuntu or Debian a while ago). Basically:
– open terminal (search “terminal”)
– type “sudo passwd”
– then enter your current (admin) user password, then enter the new root password (twice)
And voilà. On a side note, you can now use “su”. But more importantly, if you try to run those Titanium Updates/Additional package installs again, and enter the root password, it should work (NB: in my case, I chose the same password for both su and my admin user).

Posted in Uncategorized.

Tagged with .


Various Facebook funny lines #6

Time for another batch, I guess. FYI, the previous one was there.

Great minds discuss ideas, average minds discuss events, small minds discuss people. (Eleanor Roosevelt)

Today, I will be as useless as the “g” in lasagna.

I hate getting up at stupid o’clock in the morning.

My kids’ favorite thing to play with is my patience.

Just remember, if we get caught, you’re deaf and I don’t speak English.

In alcohol’s defense, I’ve done some pretty dumb shit while completely sober too.

This is by far your most fucked up idea ever… I’ll be there in 10 minutes.

People with ethics have little use for the state. The state has little use for people with ethics.

The 5 second rule for food dropped on the ground does not work if you have a 2 second dog.

Trying to pick my favorite politician is like trying to decide which STD is just right for me.

You say you value your employees, but my paycheck determined that was a lie.

I’m glad the EPA raised the “safe” radiation levels, I was starting to worry about the Fukushima disaster.

I hate the phrase “kids will be kids”, I think it should be replaced with “bad parenting results in assholes”.

Based on how I react when toasts pop out of the toaster, I will never look cool walking away from an explosion.

Weird is a side-effect of awesome.

Strange new trend at the office. People putting names on food in the company fridge. Today I had a tuna sandwich named Kevin.

Arguing with an engineer is a lot like wrestling in the mud with a pig: after a couple of hours, you realize the pig likes it.

Explaining a joke is like dissecting a frog: in the end you gain a better understanding of how it works, but the frog doesn’t survive.

Posted in funnies, Totally pointless.


How to remove an e-mail from auto-type in Gmail

Before I finally decided to pay for my e-mail address, I wasn’t able to properly send e-mails from my @mydomain.com address, and people would see my real @yahoo.com, @hotmail.com or @gmail.com (yes, I know…) and often use the latter to write to me instead of the proper one. This lead to a classic issue when I changed provider: people wouldn’t update their address book quite promptly, even when notified about it a few times and promised it wouldn’t happen again (now that I totally insist on using my @mydomain.com, it really won’t, and actually my first @mydomain.com e-mail has been active and stable for about 9 years now).

Among those, a few kept writing to outdated (and sometimes totally abandoned) e-mails for ages, despite an incredible amount of reminders to update me in their contacts. And then it struck me: the common point between all those people was… they are all @gmail.com. As a former Gmail user myself, I get the picture now: Gmail has this very handy feature to save all the e-mail addresses you ever send an e-mail to, and serve them back to you every time you write an e-mail ever after. Of course, most other e-mail providers have caught up with this nowadays. But Gmail remains unique (I think) in the way it treats those e-mails: it saves them as invisible contacts, whereas as far as I know, other providers save them as visible (although quite empty) contacts.

Well, anyway, now that you know that auto-type e-mails are stored as invisible contacts, I guess you can find out the steps to remove them: search and destroy 😉
Here is the more detailed guide, in 3 picture steps as I find Gmail’s UI quite user-unfriendly nowadays…

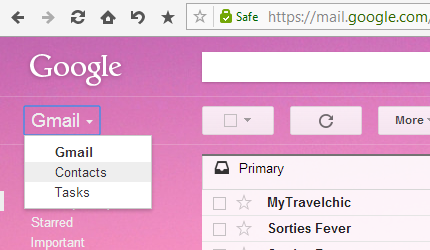
1) Go to your contacts
Gmail menu: contacts

2) Use the search box to search for the e-mail address
Search box from contact section is the same as from e-mail section, but will search for contacts rather than e-mails

3) Open the invisible contact, and use the “more” drop-down menu to delete it (“Delete contact”)
Select the More menu in the contact card, and delete

Well, that’s it. Congratulations, you won’t accidentally write to my 5 years-long abandoned e-mail anymore :-p
(…but maybe you’ll do it on purpose? ^^)

Posted in Google.


Spamhaus strikes again (with the CBL, as usual)

Just a very short post to explain why I haven’t been approving new comments for the last 10 days. On April 2, the geniuses from Spamhaus pretended they detected a “Trojan called Win32/Zbot (Microsoft)” on the server. That’s funny, because it damned looks like a Windows-specific Trojan yet this server is definitely running Linux. Even though this first detection was also the last, the server’s IP wasn’t removed from the infamous retarded CBL list (Composite Blocking List), which admittedly doesn’t work based on actual spam sent but on “suspicious” behavior. Or if you’re into movies, this would be like the Minority Report list.

My current e-mail provider, Fastmail, which provides great features BUT has a much more retarded anti-spam arsenal than Gmail or Outlook, simply silently discarded all e-mails because of that bogus listing. And voilà, this is how I didn’t receive the notifications… Say thank you to the web-nazis from Spamhaus and their blind worshipers at Fastmail…

Posted in web filtering.


How to compile and install DNScrypt (dnscrypt-proxy) on OpenSUSE

Update (2018-02-03): DNSCrypt has been discontinued (and their site is already own :/ ). But it seems that this DNSCrypt 2 project will continue development. Also this DNS Privacy Project contains interesting information (not needed to just use DNScrypt, though).

DNScrypt is a tool that allows you to send your DNS queries to something else than your ISP’s DNS servers, while also encrypting those DNS requests to prevent snooping. I’m not sure how useful it is if you’re using a VPN, but I’m more of an SSH tunnel guy and as far as I saw, about every program except Firefox (when configured properly) will still perform its DNS requests in the wild instead of via the SSH tunnel, which is kind of retarded as it defeats the purpose of the tunnel… So that’s where DNScrypt comes in handy.

I found it quite trivial to use on Windows (except that setting a custom DNS server doesn’t seem to work – on a side note, this test page is great to check whether or not you are currently using OpenDNS as your DNS server), but on OpenSUSE it’s quite tougher to set up, as you’ll have to compile it yourself. Still, with the instructions it should be easy enough (plus in the end it works better than on Windows ;))

First, install some required stuff (may be more or less depending on what is already installed on your system – if more is required, the output on ./configure should
be most helpful in finding out the missing dependency):

zypper in gcc
zypper in -t pattern devel_C_C++

Then, download and install latest libsodium (it’s a dependency for which OpenSUSE doesn’t provide packages either):

wget http://download.dnscrypt.org/libsodium/releases/libsodium-0.4.5.tar.gz
tar xf libsodium-0.4.5.tar.gz
./configure
make && make install

Then you need to run ldconfig (just type ldconfig in the console). I have no idea of what it does, but if you don’t do it the ./configure for dnscrypt-proxy will most likely fail with a message like:

configure: error: cannot run C compiled programs.
If you meant to cross compile, use `--host'.
See `config.log' for more details
configure: error: ./configure failed for src/libevent-modified

Finally, download and install the latest dnscrypt-proxy:

wget http://download.dnscrypt.org/dnscrypt-proxy/dnscrypt-proxy-1.3.3.tar.bz2
tar xf dnscrypt-proxy-1.3.3.tar.bz2
./configure
make && make install

That’s it, you can already run it in console using:

dnscrypt-proxy

However, by default, it will use OpenDNS servers. And OpenDNS is actually all but open, so you may want to switch to a more neutral provider. At list of providers can be found on http://dnscrypt.org/. To use a specific provider you’ll simply have to add some more parameters to the call, like:

dnscrypt-proxy --resolver-address=178.216.201.222:2053 --provider-name=2.dnscrypt-cert.soltysiak.com --provider-key=25C4:E188:2915:4697:8F9C:2BBD:B6A7:AFA4:01ED:A051:0508:5D53:03E7:1928:C066:8F21

Last but not least, you must now configure your connection to use 127.0.0.1 as DNS resolver. In OpenSUSE, this is done via network connection management: for each connection, click “Edit”, then in the IPv4 Address tab, configure method to “Automatic (DHCP) addresses only“, and then set DNS servers to 127.0.0.1. You may want to set DNS servers to ::1 in the IPv6 Address tab, but I didn’t try that since my ISP doesn’t support IPv6 yet.

And now that’s really it: you should be using DNScrypt. To make sure you are, you can stop dnscrypt-proxy and see that when it’s stopped you can’t access websites (NB: try this on websites that you didn’t visit very recently, otherwise their DNS records may be cached by your browser or by the system).

Of course, this isn’t a very convenient setup so far, and you may want to look up how to configure this as a daemon automatically launched at boot time. I give here brief instructions, if you need more details see http://perseosblog.com/security-encrypt-traffic-dnscrypt/.

nano /etc/init.d/after.local

at the end, add:

exec /usr/local/sbin/dnscrypt-proxy --daemonize --pidfile=/run/dnscrypt-proxy.pid --resolver-address=178.216.201.222:2053 --provider-name=2.dnscrypt-cert.soltysiak.com --provider-key=25C4:E188:2915:4697:8F9C:2BBD:B6A7:AFA4:01ED:A051:0508:5D53:03E7:1928:C066:8F21

I’m not sure how necessary the PID file is, but I preferred not to try to mess up with it. Now your setup is complete: your DNS requests are encrypted, sent via DNScrypt to a DNS server different from OpenDNS (or not), and that setup is automatically loaded at start-up. Enjoy 🙂

Posted in cryptography, Internet, Linux, privacy.